Data Science Pipelines Using Kubeflow in Red Hat OpenShift AI
Red Hat OpenShift AI offers two out-of-the-box mechanisms to work with Data Science Pipelines in terms of building and triggering pipelines.
The first mechanism is the Elyra Pipelines JupyterLab extension, which provides a visual editor for creating pipelines based on Jupyter notebooks as well as Python or R scripts.
The second mechanism and the one discussed here is based on the Kubeflow Pipelines SDK. With the SDK, pipelines are built using Python scripts and submitted to the Data Science Pipelines runtime to be scheduled for execution.
|
There is work in progress to integrate Kubeflow Pipelines version 2 in Data Science Pipelines. At the time of writing Kubeflow Pipelines version 1 is used, which needs to be considered when referring to the SDK documentation. |
In Red Hat OpenShift AI, we use the Tekton runtime to execute pipelines, which is why the Python script needs to be compiled into a Tekton definition before it can be submitted to the runtime.
In Red Hat OpenShift AI, the Data Science Pipeline runtime consists of the following components:
-
A Data Science Pipeline Server container.
-
A MariaDB for storing pipeline definitions and results.
-
A Pipeline scheduler for scheduling pipeline runs.
-
A Persistent Agent to record the set of containers that executed as well as their inputs and outputs.
Steps in the pipeline are executed as ephemeral pods (one per step).
|
DS Pipelines in Red Hat OpenShift AI are managed by the |
Creating a Data Science Pipeline with the KFP SDK
Prerequisites
-
Python Setup
pip install kfp==1.8.22
pip install kfp-tekton==1.8.0
| Using the correct Python module versions is critical to avoid conflicts between the KFP SDK and Data Science Pipelines versions. |
-
S3 Storage
You can use any S3 compatible storage service such as Red Hat OpenShift Data Foundation or AWS S3. For the purpose of this enablement we will be using Minio.
Follow these instructions to setup a local Minio instance on your OpenShift cluster.
Creating a Pipeline Server
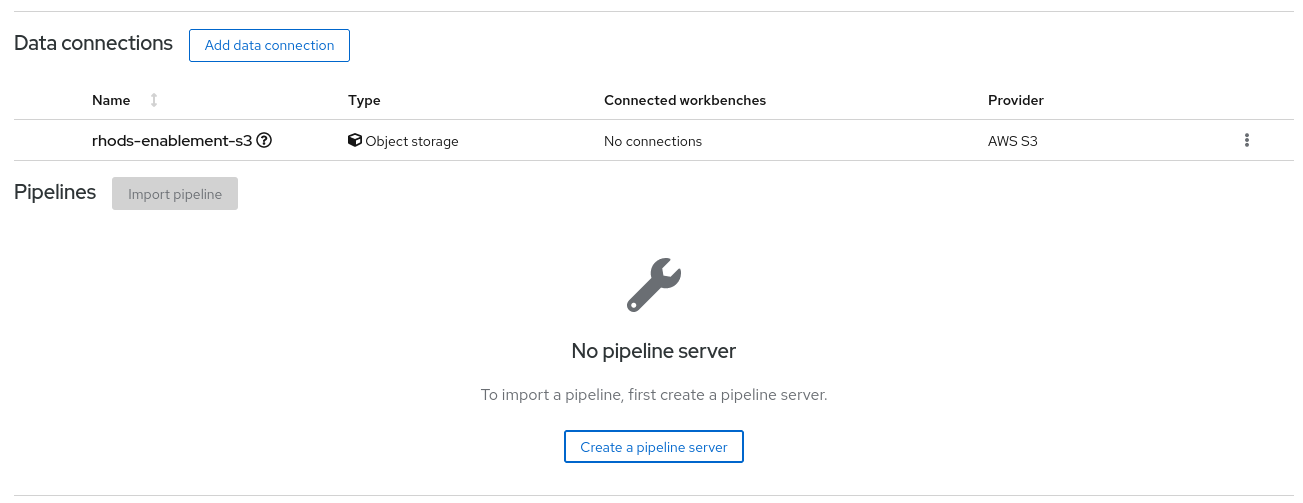
To execute pipelines a Pipeline server needs to be created, which in turn depends on the creation of an S3 Storage bucket. This is used to store the run artifacts and outputs of any pipeline run on the associated server.
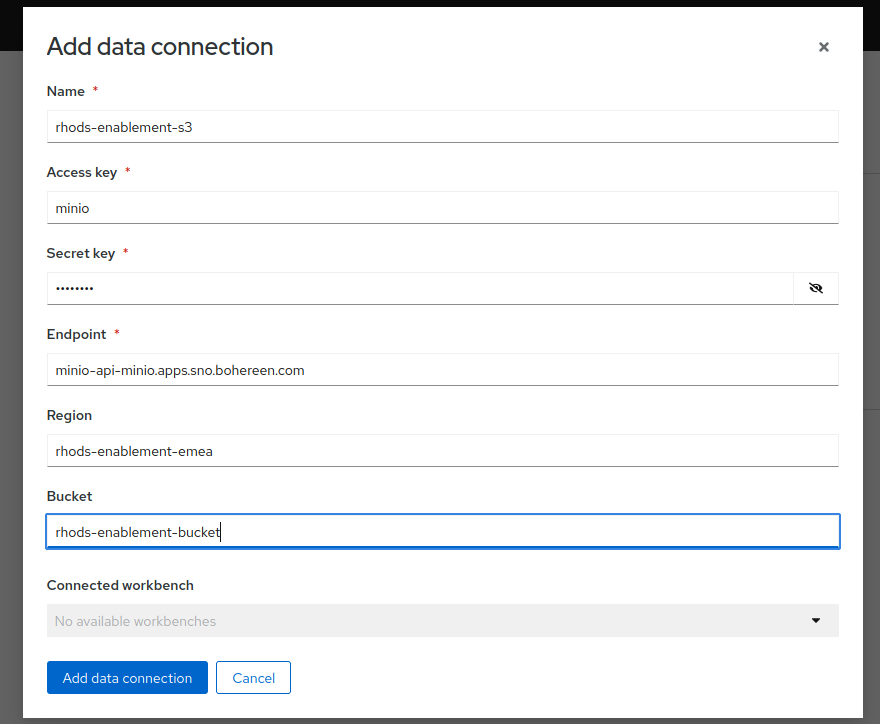
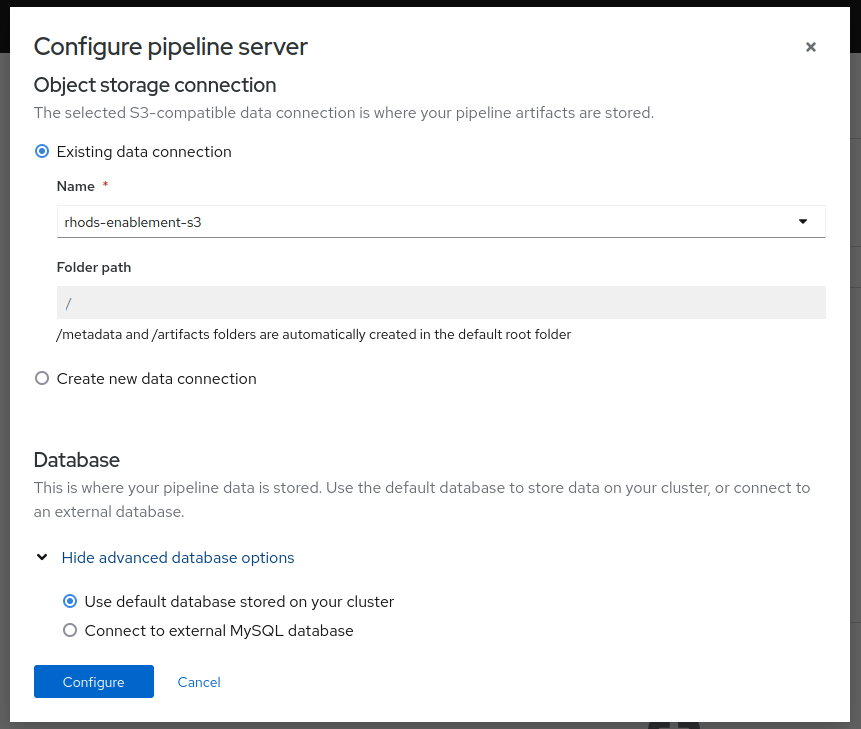
Once the data connection is created then the pipeline server can be created
Building and deploying a Pipeline
The following is a simplistic example of a KFP pipeline. The original is at https://github.com/kubeflow/kfp-tekton/blob/master/samples/flip-coin/condition.py and the example has downloaded it to a file named coin-toss.py
To compile it into a Tekton resource definition just run the following in a terminal
python3 coin-toss.pyIt will generate a Tekton Pipeline Run , similar to this snippet
The resulting yaml file (coin-toss.yaml) can then be uploaded throught the UI
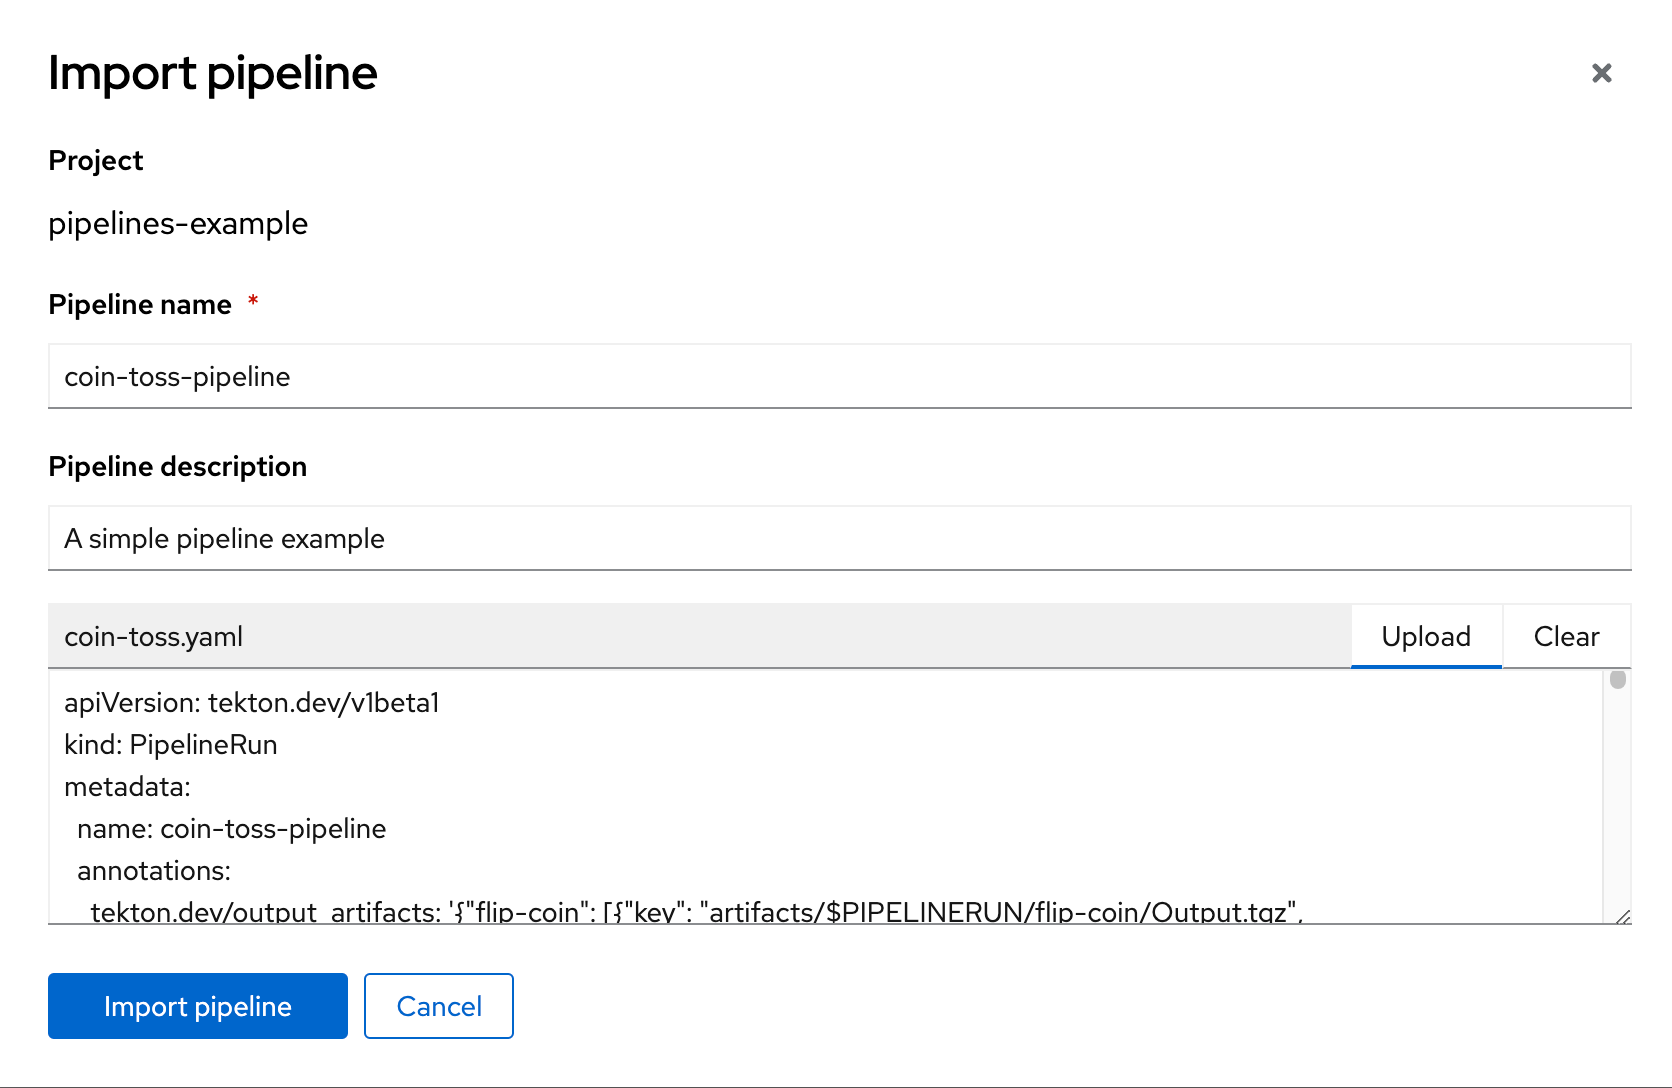
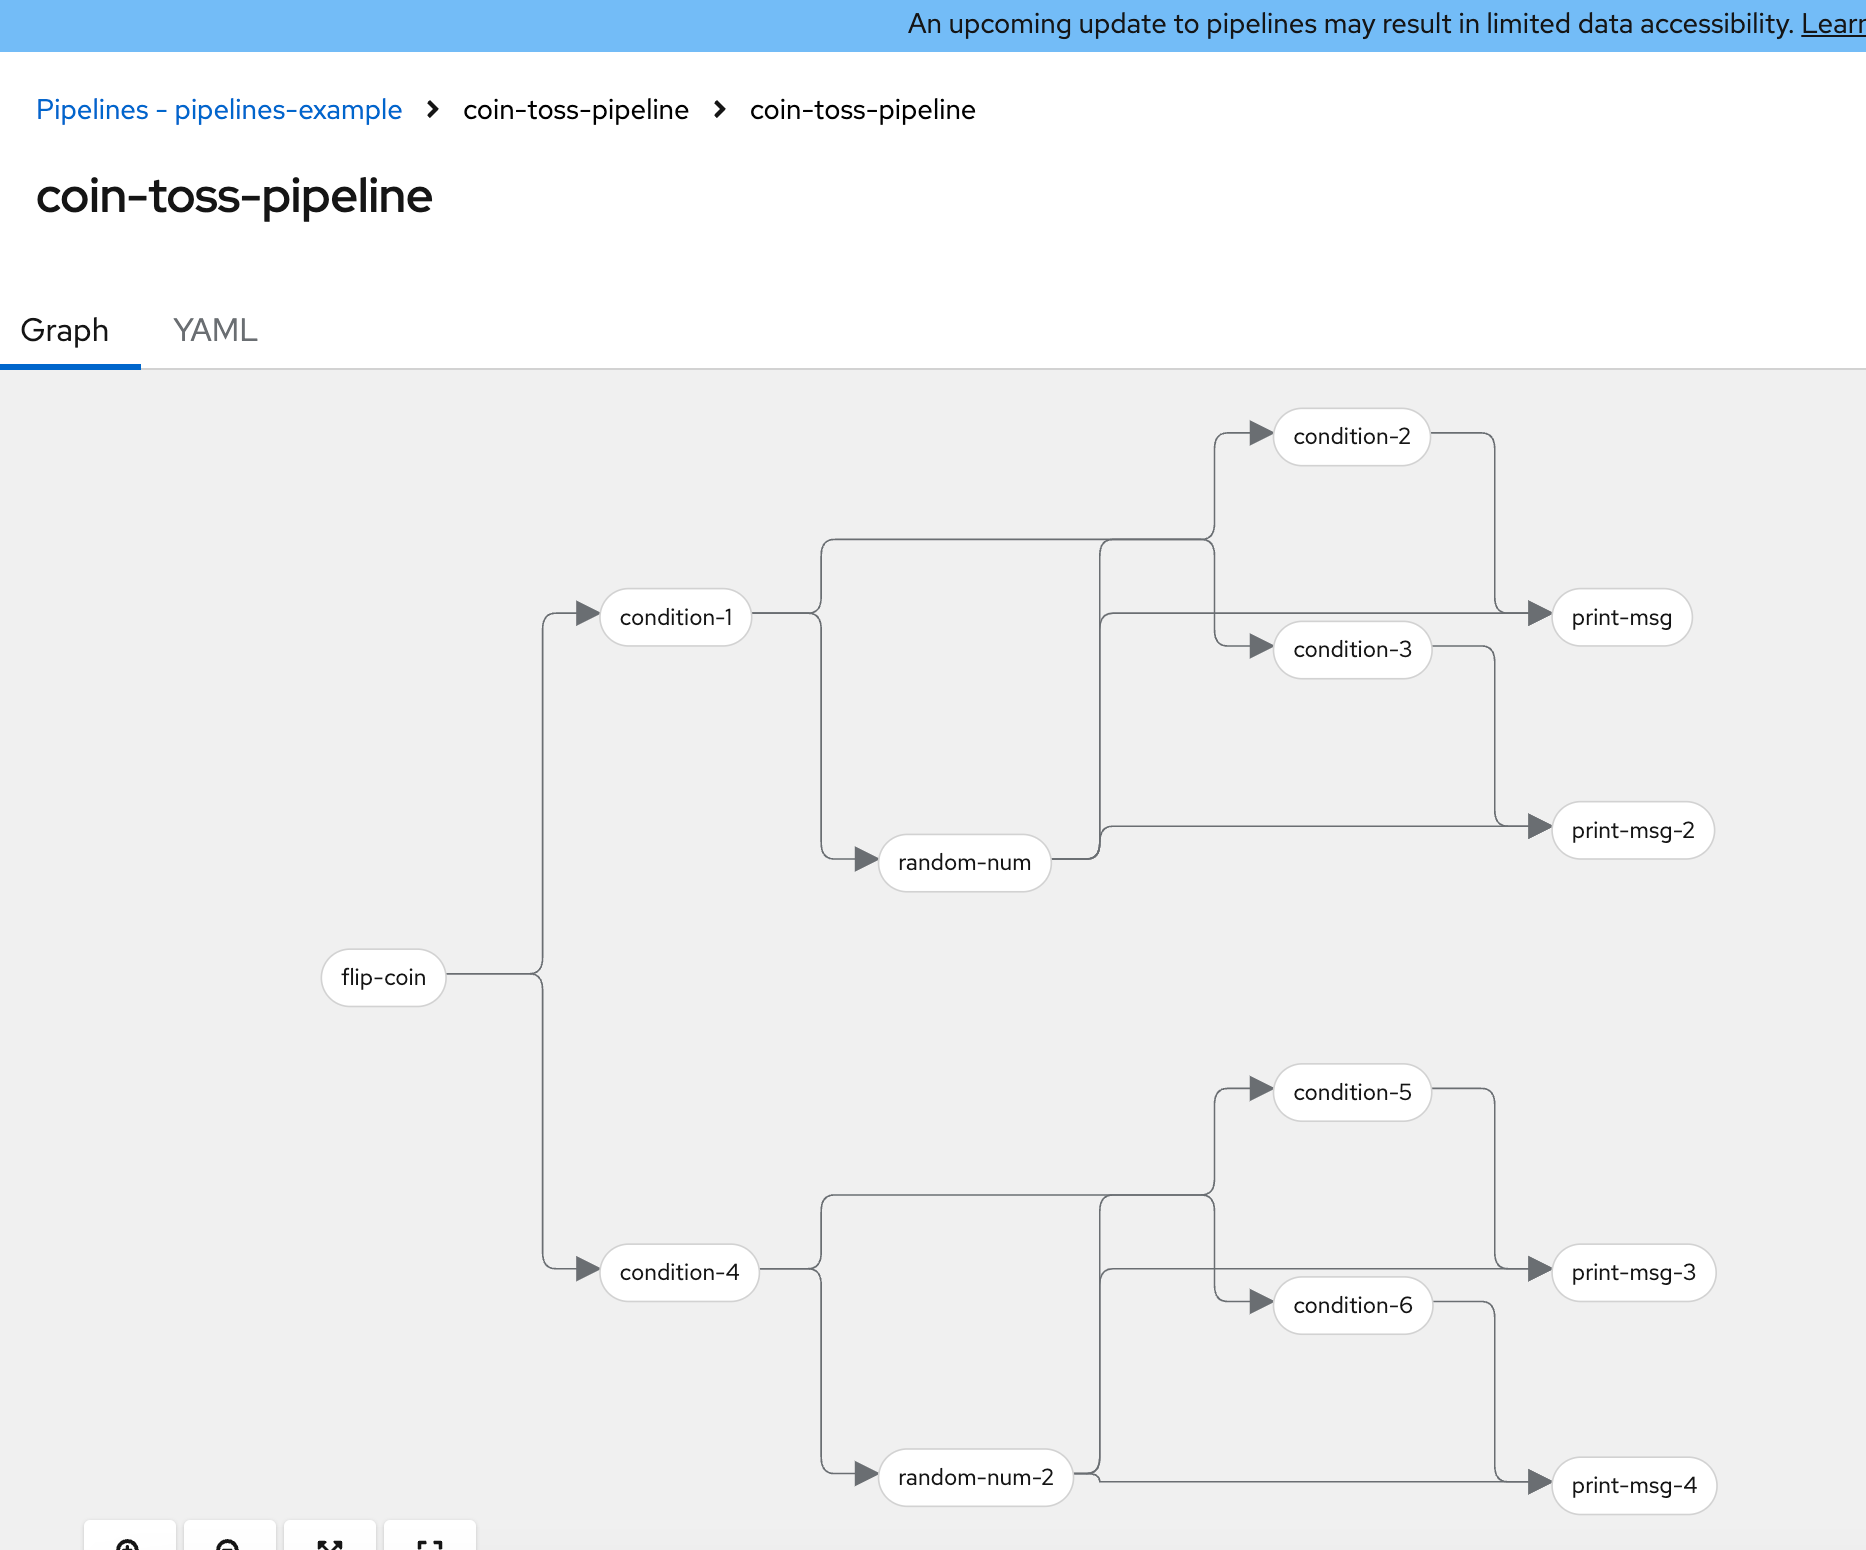
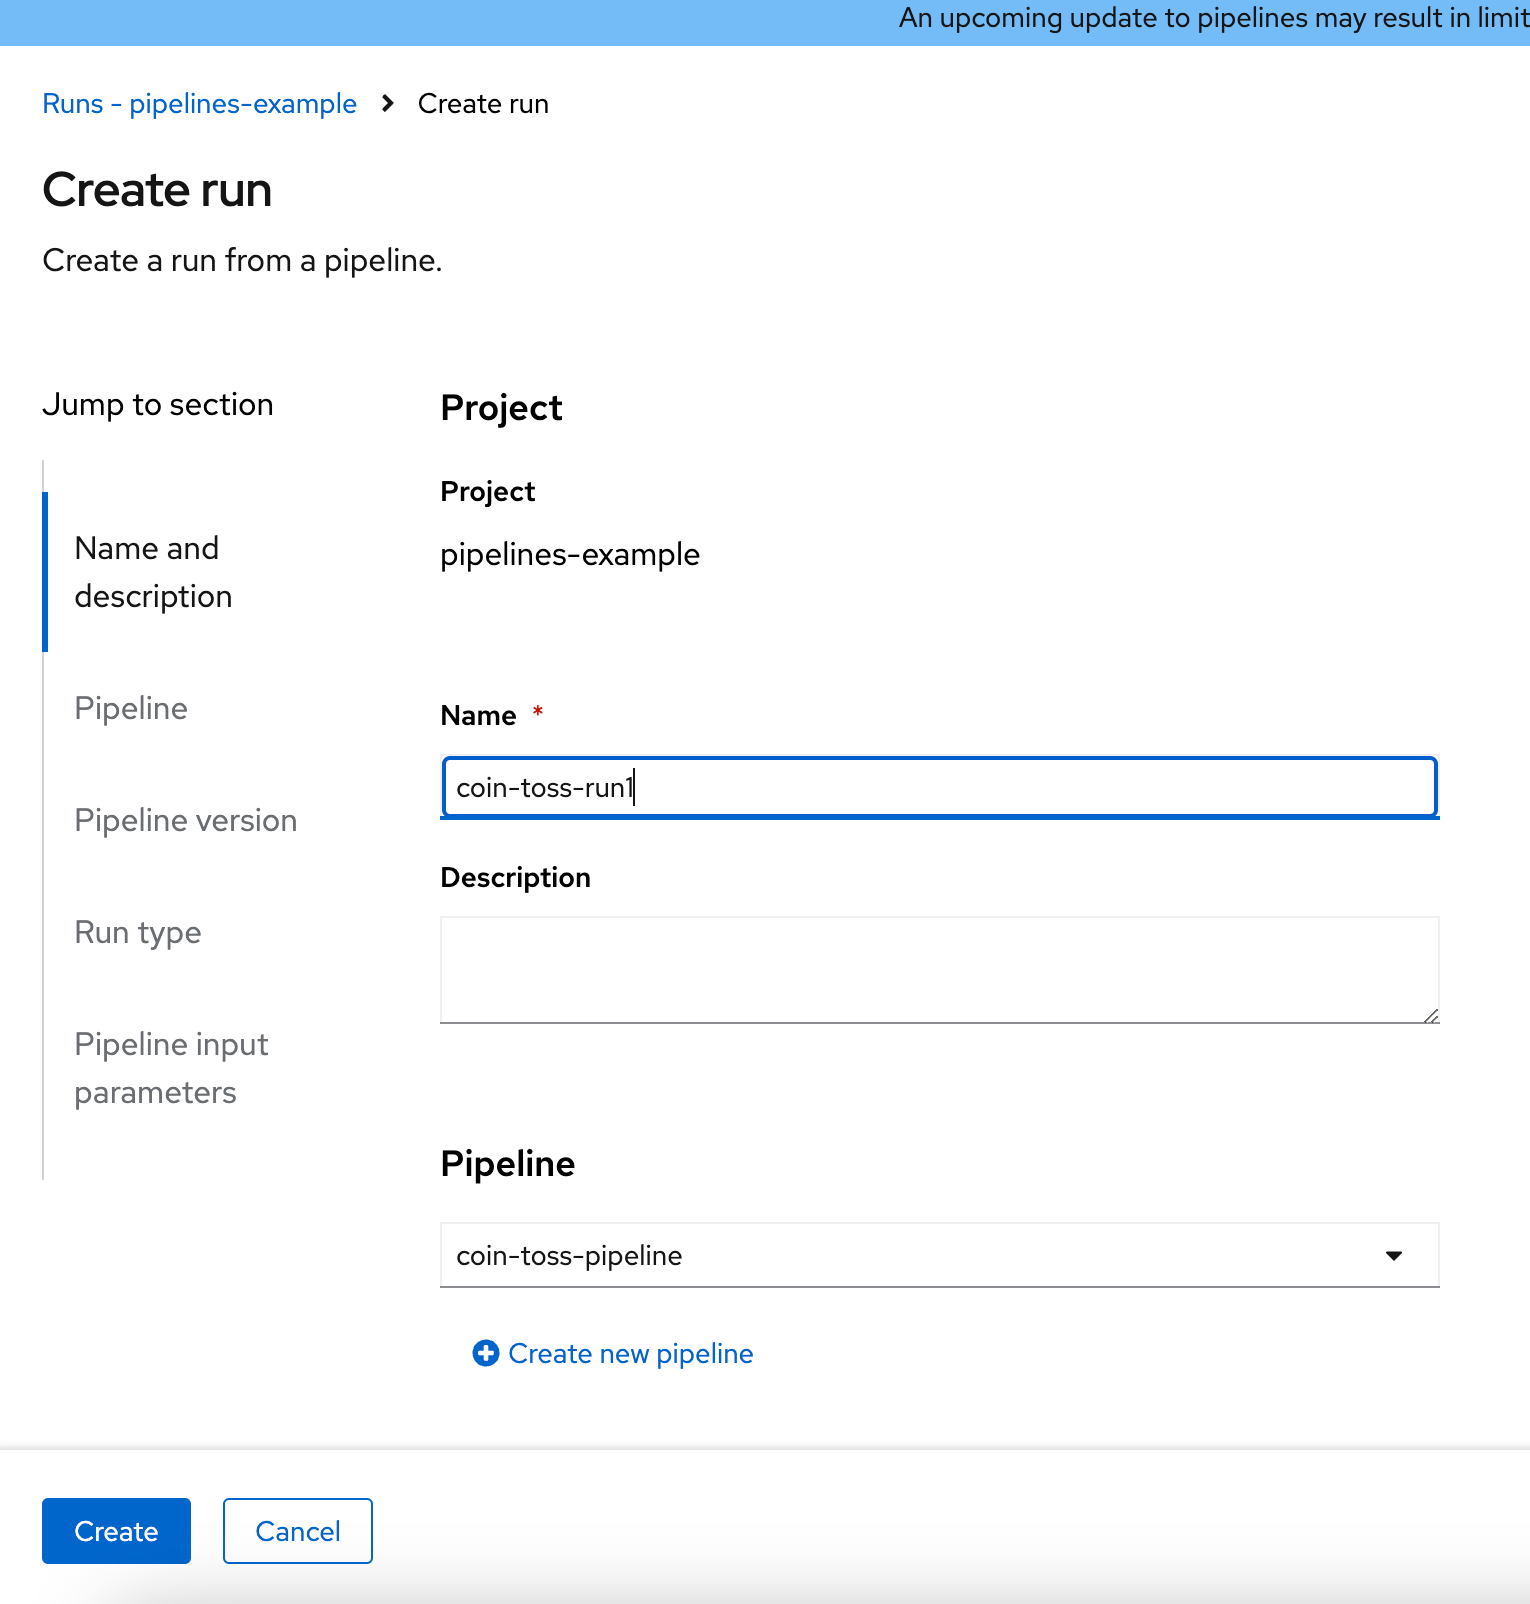
Once imported the structure of the DAG will be shown. Each step in the pipeline will be run as a container on OpenShift.
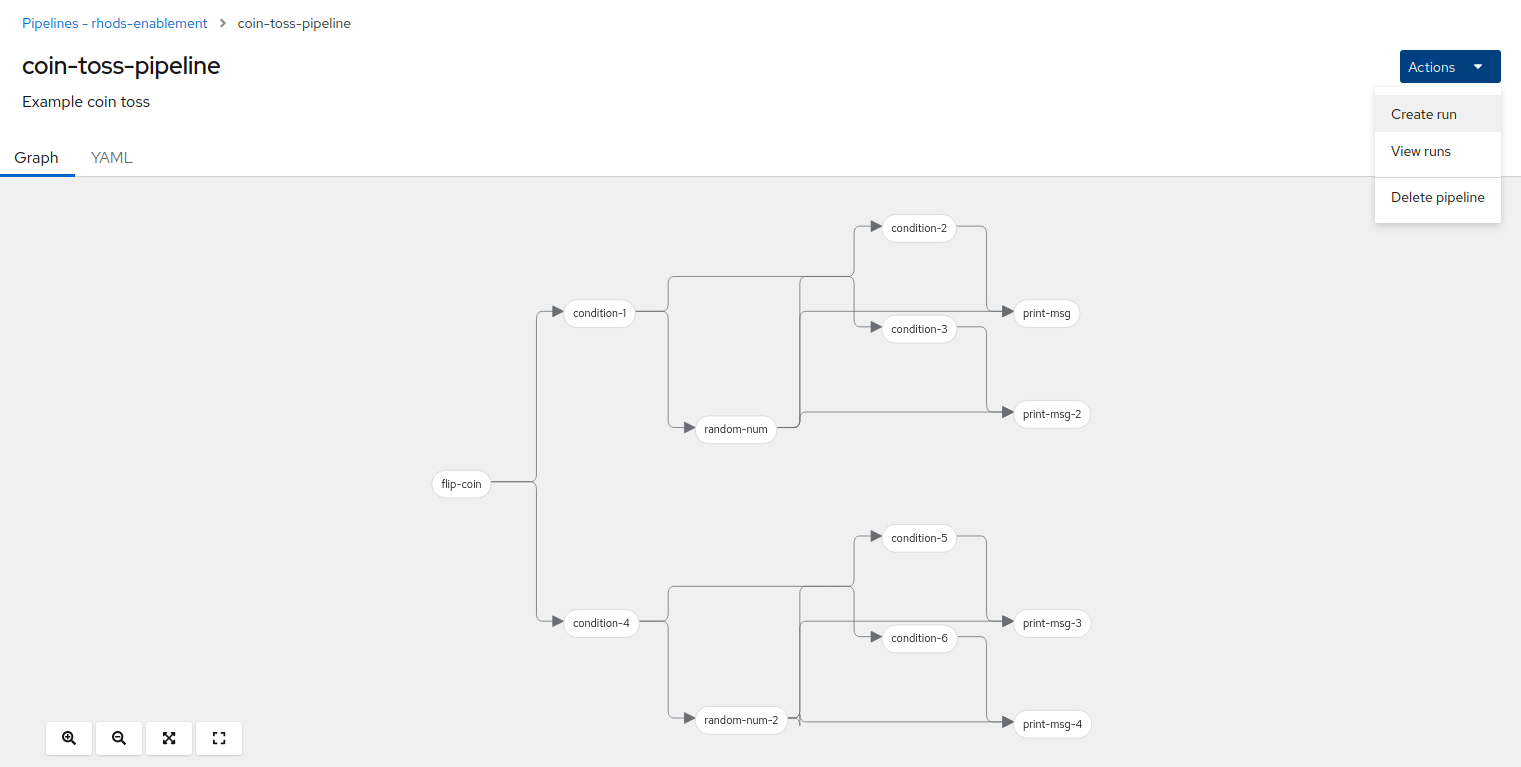
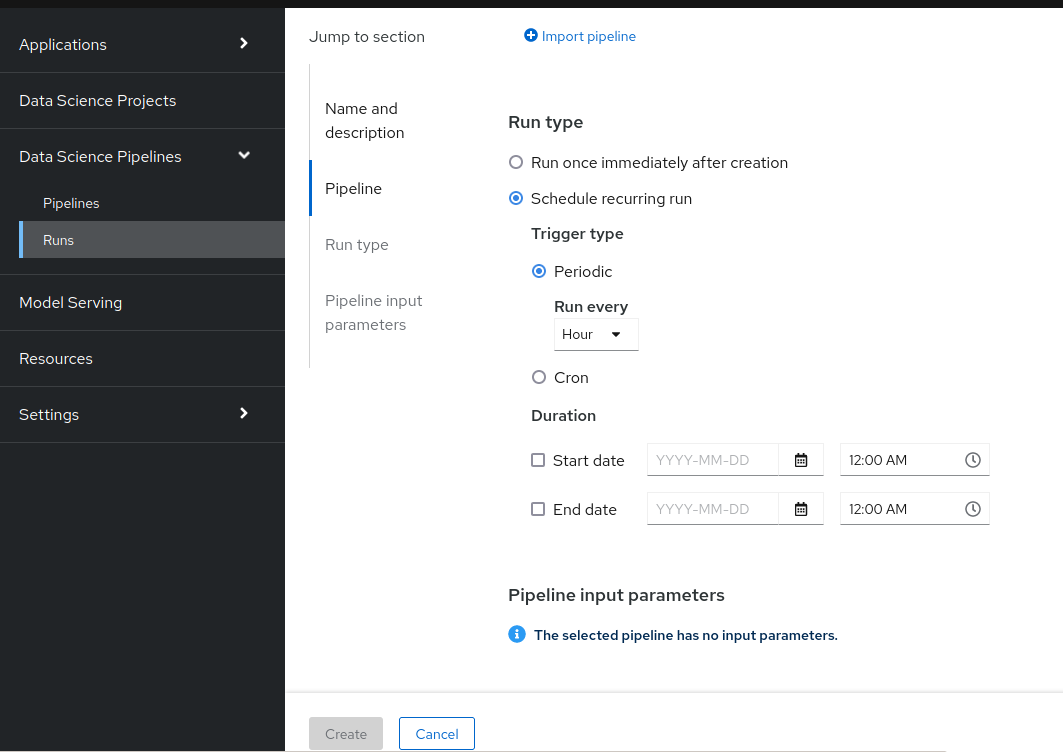
To execute the pipeline, click on Create Run in the menu and fill out the Name and Description. If the pipeline has Input Parameters or you need to schedule a recurring run, then that can be configured further down. Once ready, click Create to submit the pipeline for scheduling.
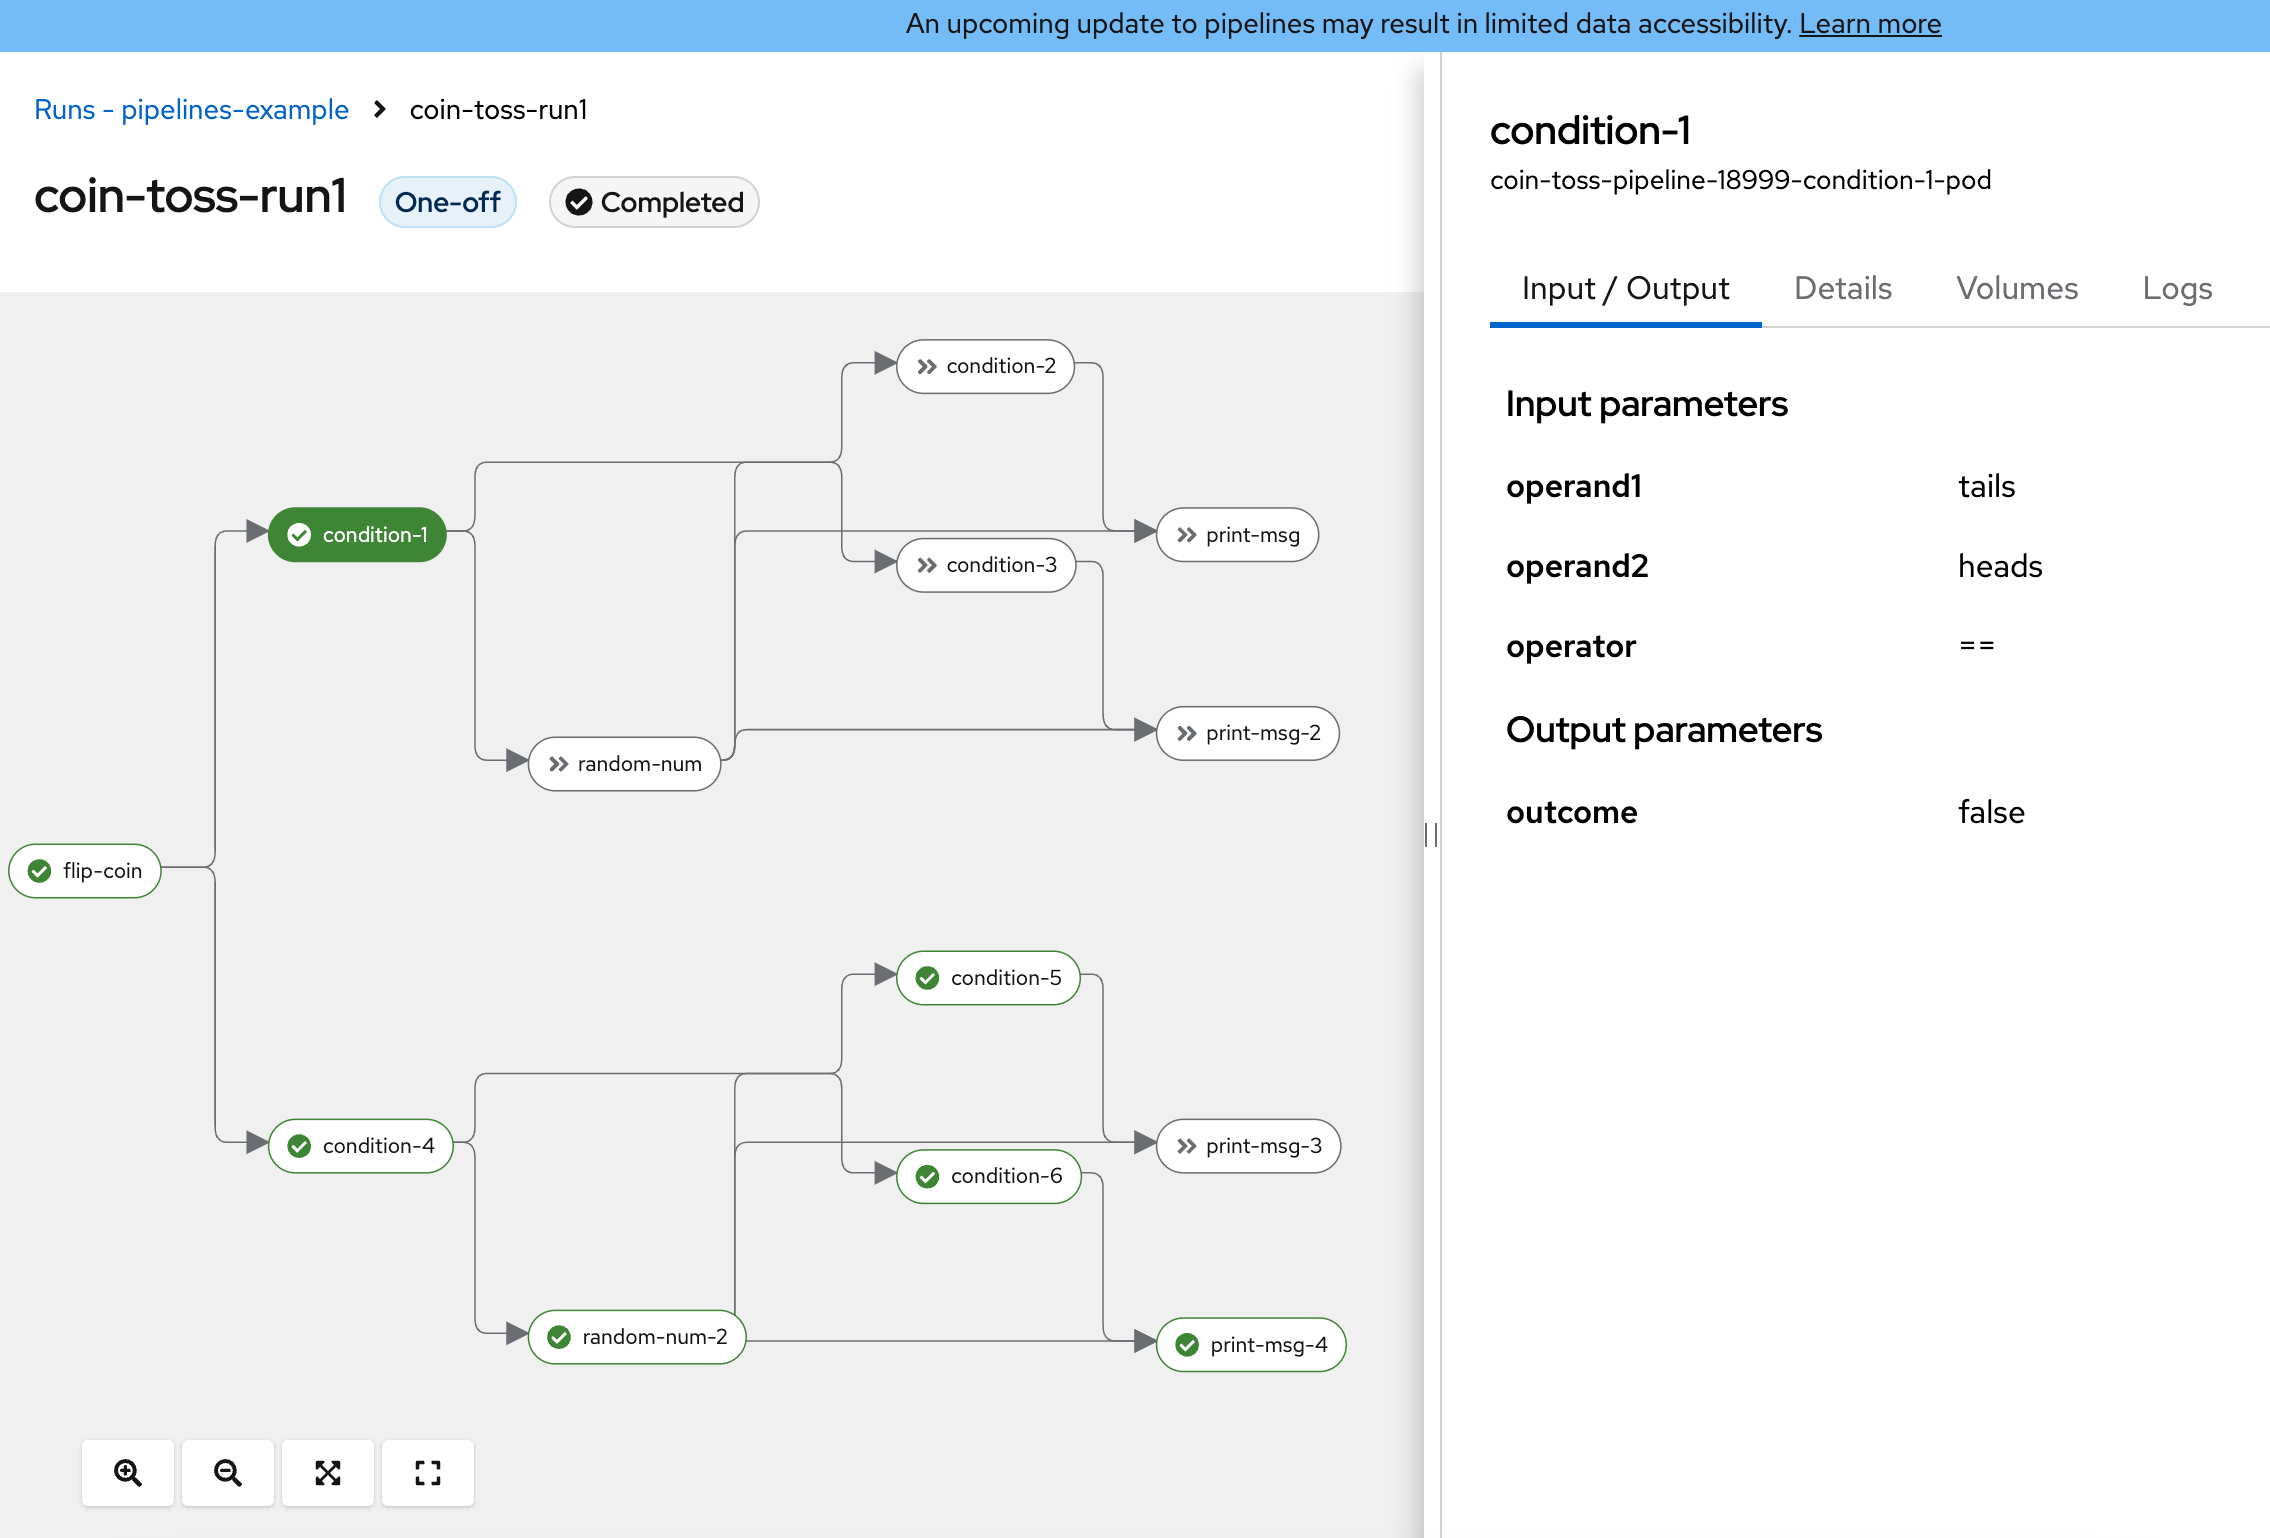
The pipeline will execute and the outputs will be stored into the configured S3 bucket. As the pipeline executes the view will be updated to show the steps being executed. It’s possible to click on the graph nodes to reveal information of the steps.
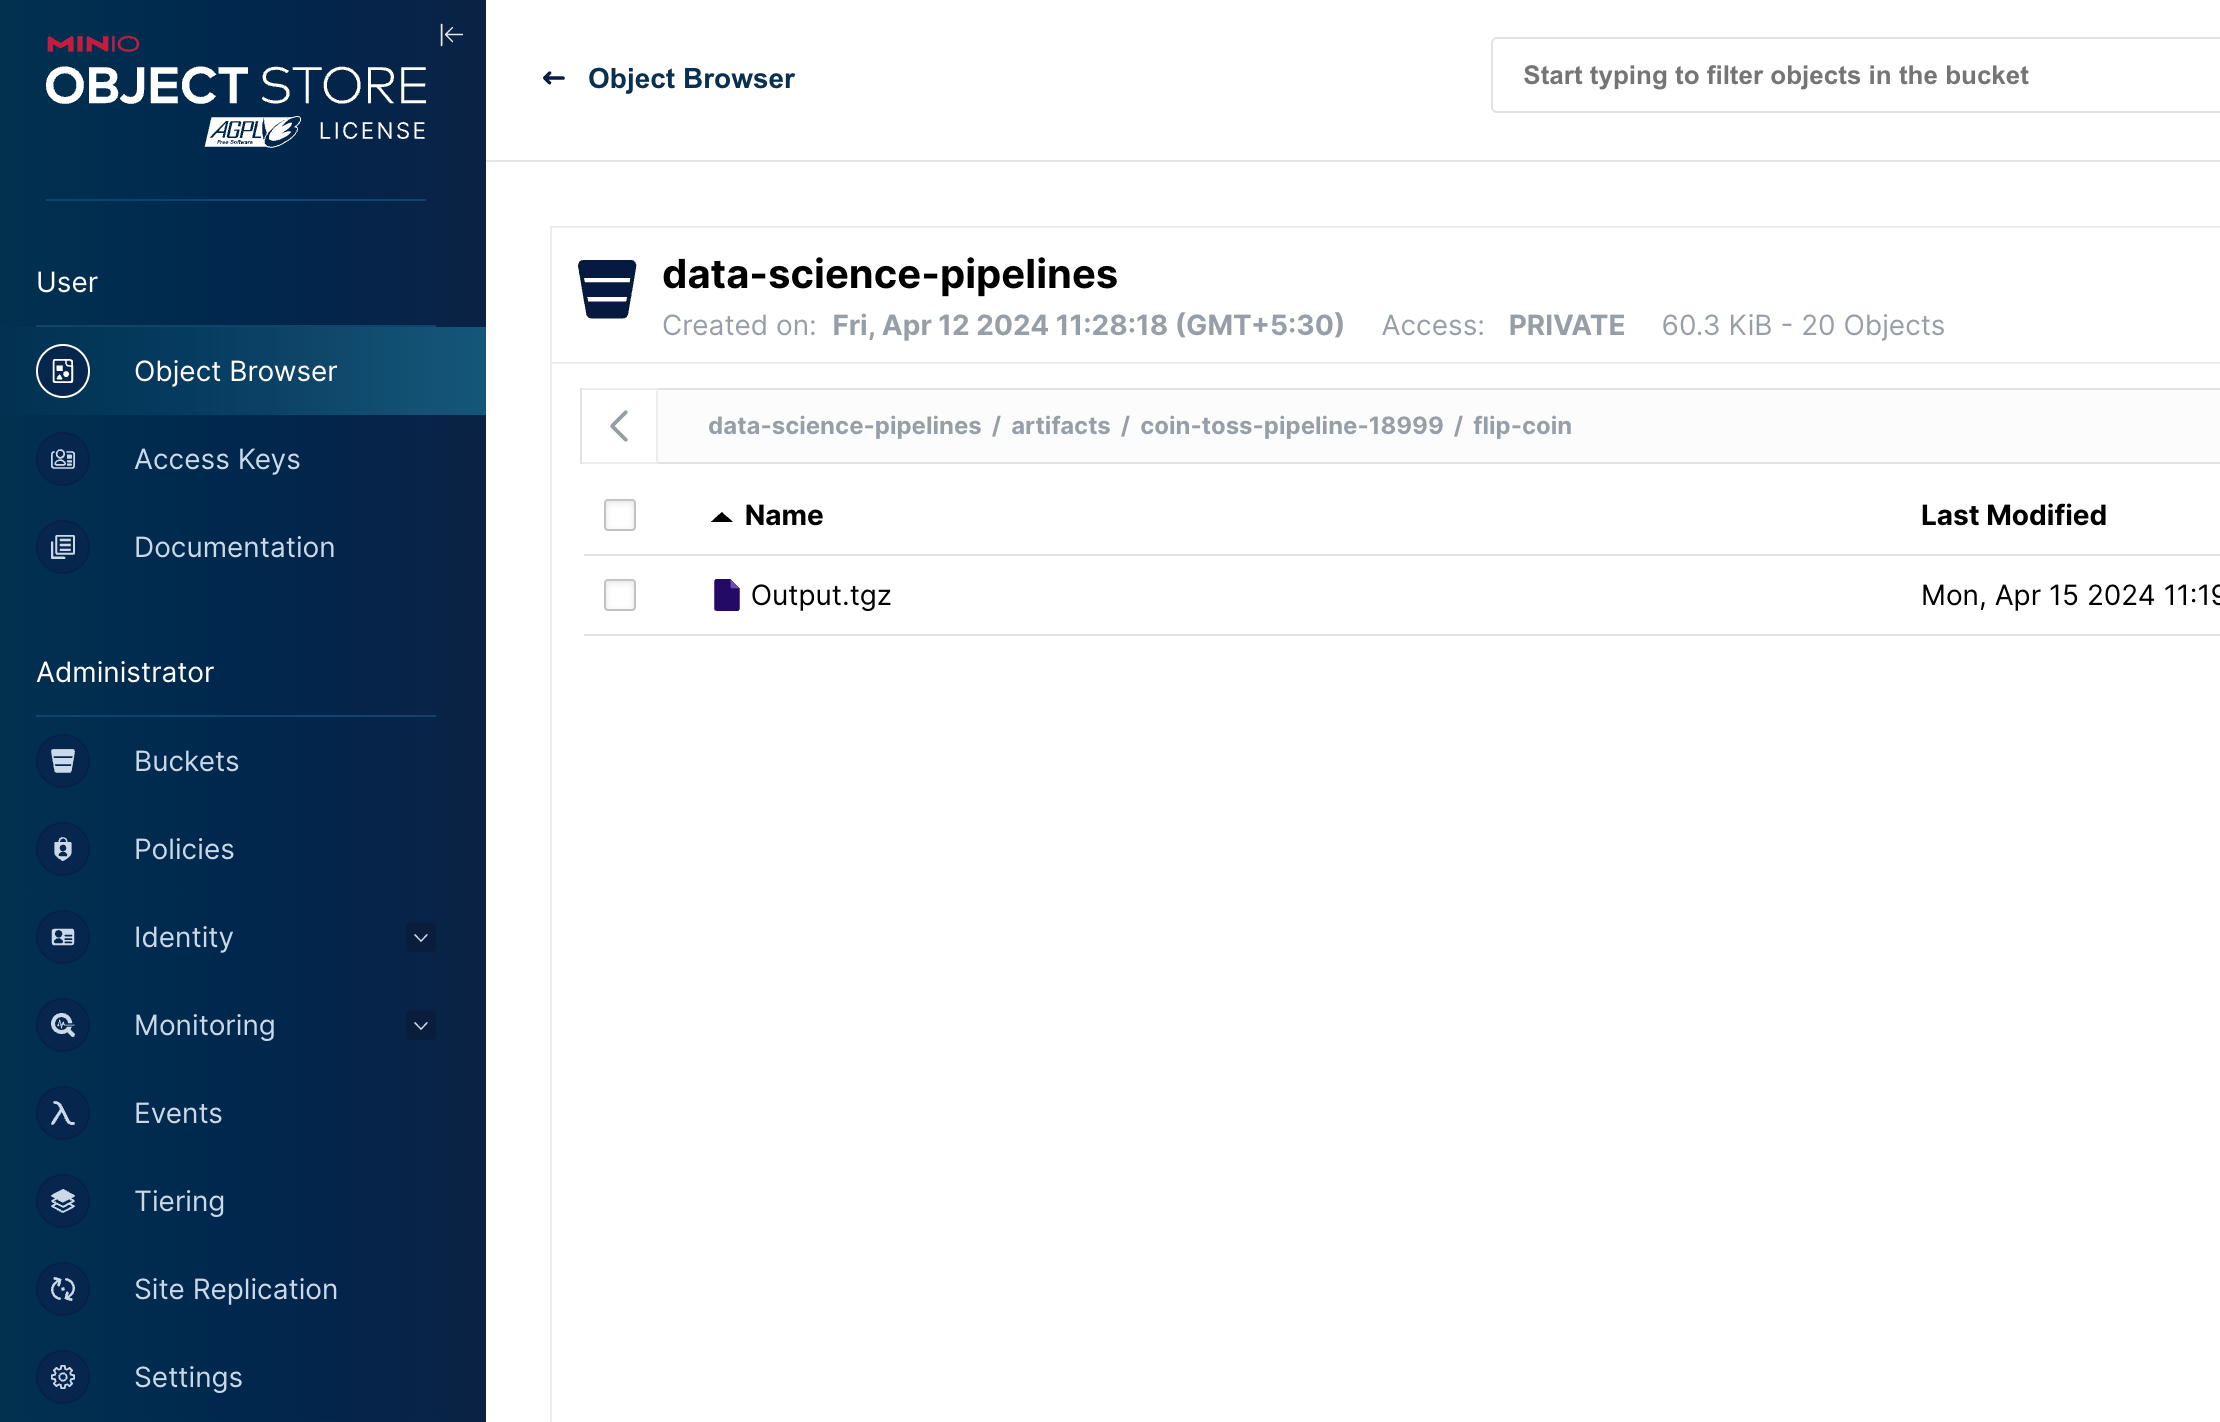
Once the pipeline has completed, it is possible to access the output and pipeline artifacts (if used) in the object storage browser of the Minio Storage UI.
Experiments And Runs
An experiment is a workspace where you can try different configurations of your pipelines. You can use experiments to organize your runs into logical groups. Experiments can contain arbitrary runs, including recurring runs.
A run can be configured using the DSP UI or programatically using the KFP SDK.
| Experiments are part of the KFP SDK and are not currently covered in this course. |
Real World Example
In this section we’re going to demonstrate a real world Data Science Pipelines scenario.
In this scenario we have a remote edge device which uses an AI model to manage the characteristics of its battery usage depending on the environment it’s deployed in. On a regular schedule it uploads battery events via a data gateway, and those battery events are used to train a model which is then retrieved by the device and used.
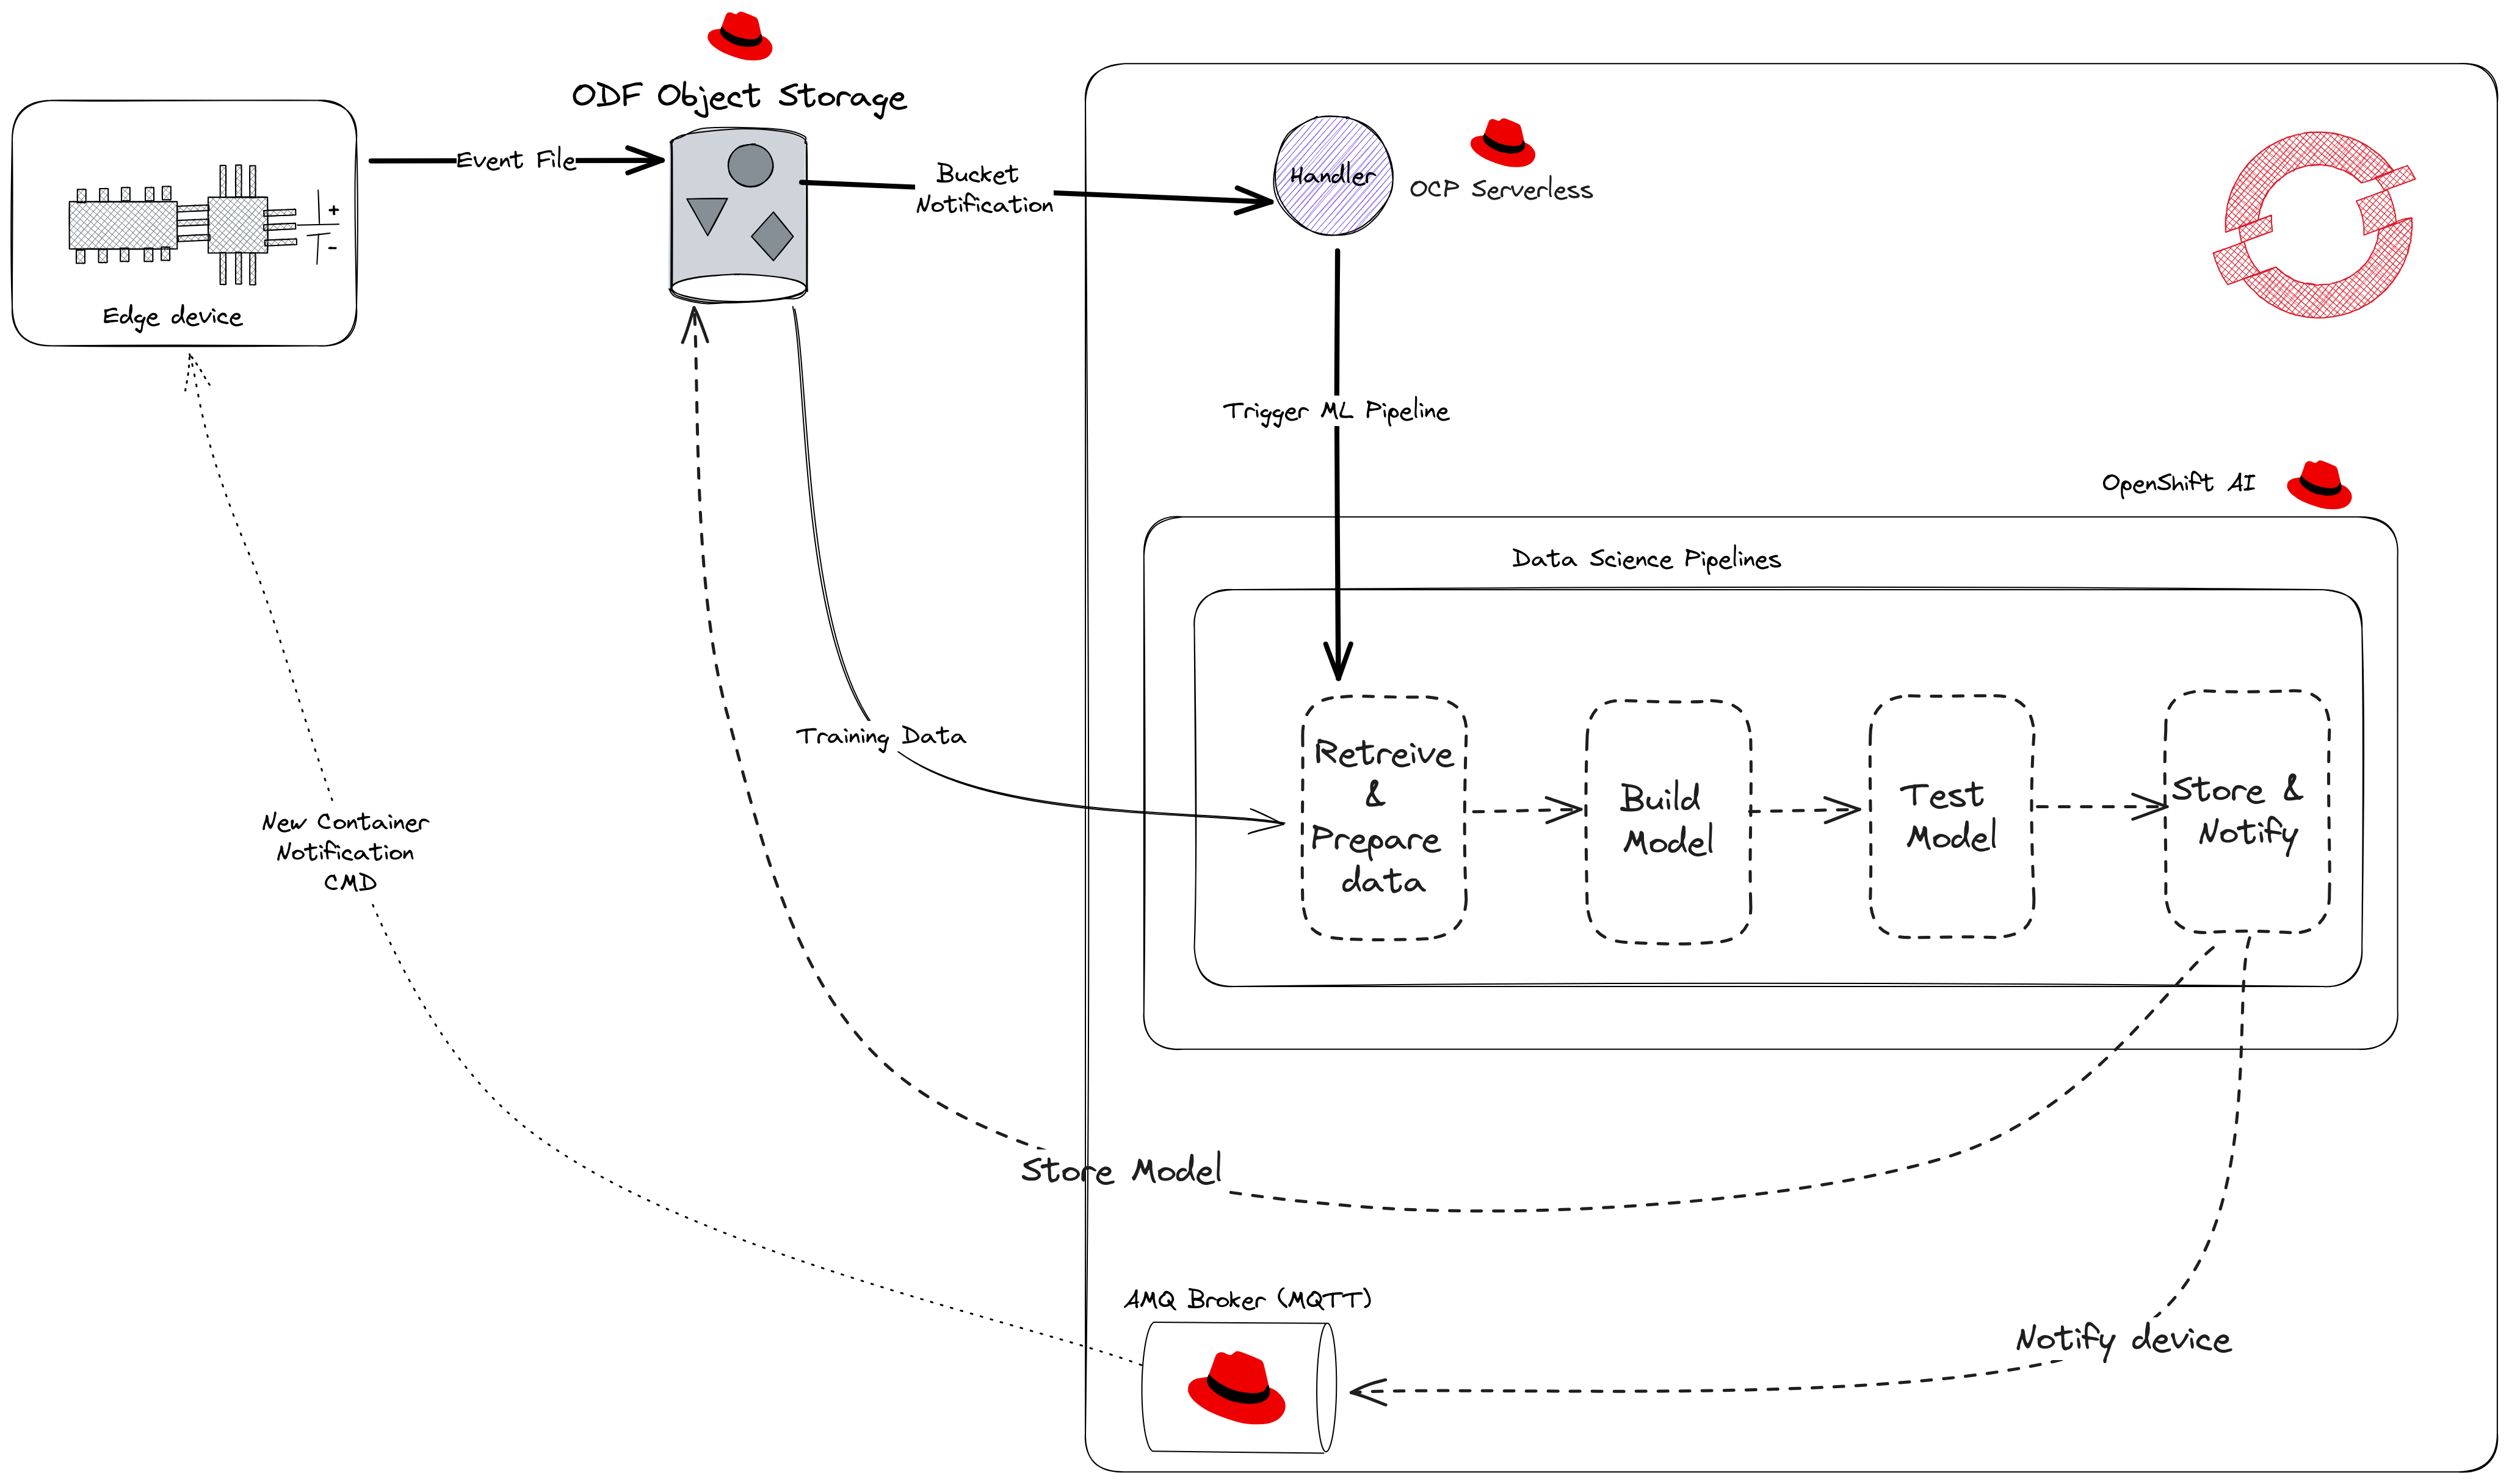
The entire pipeline is here.
We’re not going to go through all of it but focus on the key aspects of it.
The actual pipeline is defined by the following function:
The '@dsl.pipeline' parameters provide the name and description if you were uploading the pipeline via an API call. The DSP UI overwrites these values.
The function edgetest_pipeline is the implementation of the pipeline.
Pipeline Parameters
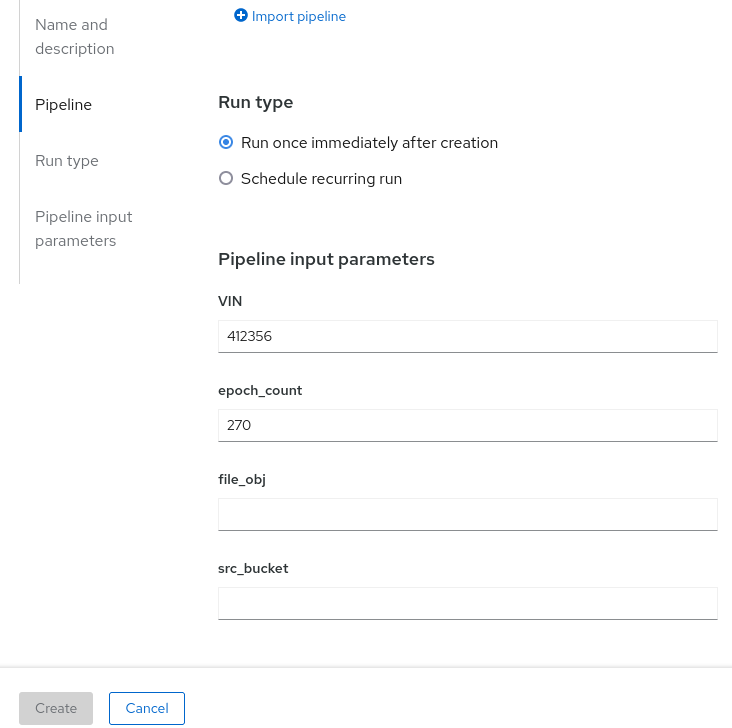
The pipeline has four parameters:
-
file_obj and src_bucket refer to S3 bucket details and can be ignored.
-
VIN is the edge device identifier and has a default value of 412356.
-
epoch_count is the number of training epochs to be used.
In the Create Run UI these parameters are available so that users can override the values as they need.
Pipeline Steps
The file contains the following Python functions, which roughly correspond to the steps in the diagram above
-
load_trigger_data()
-
prep_data_train_model()
-
model_upload_notify()
-
model_inference()
These functions are mapped into individual containers by using the create_component_from_func function. You can specify the container base_image to use as well as any additional Python packages to be installed into the container at execution time.
load_trigger_data_op= components.create_component_from_func(
    load_trigger_data, base_image='registry.access.redhat.com/ubi8/python-38')
prep_train_data_op= components.create_component_from_func(
    prep_data_train_model, base_image='quay.io/mickeymouse/awesomepython-30')
upload_model_op= components.create_component_from_func(
    model_upload_notify, base_image='registry.access.redhat.com/ubi8/python-38'
    ,packages_to_install=['kaleido','paho-mqtt','boto3'])
prep_inference_data_op= components.create_component_from_func(
    prep_data_train_model, base_image='registry.access.redhat.com/ubi8/python-38')
inference_model_op= components.create_component_from_func(
    model_inference, base_image='registry.access.redhat.com/ubi8/python-38')
The Python functions can be used in multiple different step definitions; in the example the prep_data_train_model function is used in the prep_data_train_op and the prep_inference_data_op containers.
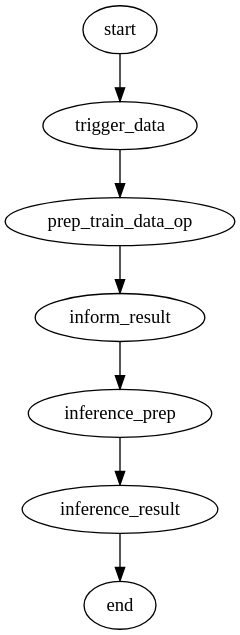
The pipeline execution graph is created using the following code:
trigger_data = load_trigger_data_op(file_obj, src_bucket,file_destination) prep_train_data = prep_train_data_op(data_path="/opt/data/pitstop/",epoch_count=epoch_count,experiment_name=trigger_data.output,run_mode=0).after(trigger_data) inform_result = upload_model_op(data_path="/opt/data/pitstop/",paramater_data=prep_train_data.outputs["parameter_data"],experiment_name=trigger_data.output) inference_prep = prep_inference_data_op(data_path="/opt/data/pitstop/",epoch_count=epoch_count,experiment_name=trigger_data.output,run_mode=2).after(inform_result) inference_result = inference_model_op(data_path="/opt/data/pitstop/",paramater_data=inference_prep.outputs["parameter_data"],experiment_name=trigger_data.output,vin=VIN)|
The execution order of the graph is top down but also can be controlled by using the .after() operator. There are other operators which control the flow of pipeline execution such as Condition , ExitHandler, ParallelFor . These are not covered as part of this course but the KFP documentation has examples. |
The following diagram shows the order of execution.
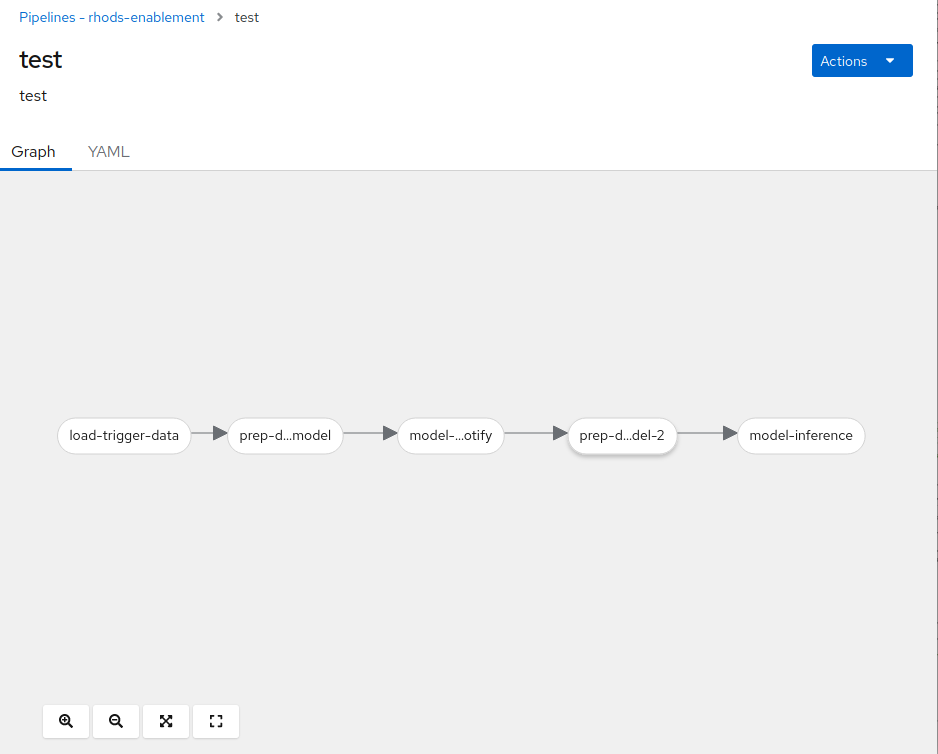
This is also visible in the Red Hat OpenShift AI user interface:
Pipeline Parameter Passing
As each step of our pipeline is executed in an independent container, input parameters and output values are handled as follows.
Input Parameters
-
Simple parameters - booleans, numbers, strings - are passed by value into the container as command line arguments.
-
Complex types or large amounts of data are passed via files. The value of the input parameter is the file path.
Passing Parameters via Files
To pass an input parameter as a file, the function argument needs to be annotated using the InputPath annotation. For returning data from a step as a file, the function argument needs to be annotated using the OutputPath annotation.
In both cases the actual value of the parameter is the file path and not the actual data. So the pipeline will have to read/write to the file as necessary.
For example, in our sample pipeline we use the parameter_data argument of the prep_data_train_model function to return multiple data values as a file. Here’s the function definition with the OutputPath annotation
def prep_data_train_model(data_path : str, epoch_count : int, parameter_data : OutputPath(), experiment_name : str, run_mode : int=0):Here’s the actual writing of the data to the file
data_store = [train_x, train_y, train_battery_range, train_y_soh, y_norm, test_x, test_y]with open(parameter_data, "b+w") as f:
pickle.dump(data_store,f)
This data is then consumed in the model_upload_notify function, passed via the paramater_data with the InputPath annotation.
def model_upload_notify(data_path:str,paramater_data:InputPath(),experiment_name:str,model_bucket:str="battery-model-bucket"):Reading the data
    f = open(paramater_data,"b+r")
    data_store = pickle.load(f)
Linking the two functions together
inform_result = upload_model_op(data_path="/opt/data/pitstop/",paramater_data=prep_train_data.outputs["parameter_data"],experiment_name=trigger_data.output)|
There are other parameter annotations available to handle specialised file types such as InputBinaryFile, OutputBinaryFile. The full annotation list is in the KFP component documentation. |
Returning multiple values from a step
If you return a single small value from your component using the return statement, the output parameter is named output. It is, however, possible to return multiple small values using the Python collection library method namedtuple.
From a Kubeflow pipelines example
def produce_two_small_outputs() -> NamedTuple('Outputs', [('text', str), ('number', int)]):
    return ("data 1", 42)
consume_task3 = consume_two_arguments(produce2_task.outputs['text'], produce2_task.outputs['number'])
The KFP SDK uses the following rules to define the input and output parameter names in your component’s interface:
-
If the argument name ends with path and the argument is annotated as an _kfp.components.InputPath or kfp.components.OutputPath, the parameter name is the argument name with the trailing _path removed.
-
If the argument name ends with _file, the parameter name is the argument name with the trailing _file removed.
-
If you return a single small value from your component using the return statement, the output parameter is named output.
-
If you return several small values from your component by returning a collections.namedtuple, the SDK uses the tuple’s field names as the output parameter names.
-
Otherwise, the SDK uses the argument name as the parameter name.
|
In the Tekton definition you can see the definition of the input and output artifacts. This can be useful for debugging purposes. tekton.dev/input_artifacts: '{"model-inference": [{"name": "load-trigger-data-Output",
"parent_task": "load-trigger-data"}, {"name": "prep-data-train-model-2-parameter_data",
"parent_task": "prep-data-train-model-2"}], "model-upload-notify": [{"name":
"load-trigger-data-Output", "parent_task": "load-trigger-data"}, {"name": "prep-data-train-model-parameter_data",
"parent_task": "prep-data-train-model"}], "prep-data-train-model": [{"name":
"load-trigger-data-Output", "parent_task": "load-trigger-data"}], "prep-data-train-model-2":
[{"name": "load-trigger-data-Output", "parent_task": "load-trigger-data"}]}'
tekton.dev/output_artifacts: '{"load-trigger-data": [{"key": "artifacts/$PIPELINERUN/load-trigger-data/Output.tgz",
  "name": "load-trigger-data-Output", "path": "/tmp/outputs/Output/data"}], "prep-data-train-model":
  [{"key": "artifacts/$PIPELINERUN/prep-data-train-model/parameter_data.tgz",
  "name": "prep-data-train-model-parameter_data", "path": "/tmp/outputs/parameter_data/data"}],
  "prep-data-train-model-2": [{"key": "artifacts/$PIPELINERUN/prep-data-train-model-2/parameter_data.tgz",
  "name": "prep-data-train-model-2-parameter_data", "path": "/tmp/outputs/parameter_data/data"}]}'
tekton.dev/artifact_items: '{"load-trigger-data": [["Output", "$(results.Output.path)"]],
  "model-inference": [], "model-upload-notify": [], "prep-data-train-model": [["parameter_data",
  "$(workspaces.prep-data-train-model.path)/artifacts/$ORIG_PR_NAME/$(context.taskRun.name)/parameter_data"]],
  "prep-data-train-model-2": [["parameter_data", "$(workspaces.prep-data-train-model-2.path)/artifacts/$ORIG_PR_NAME/$(context.taskRun.name)/parameter_data"]]}'
You can also see the locations of data stored into the S3 bucket e.g. artifacts/$PIPELINERUN/prep-data-train-model-2/parameter_data.tgz |
Execution on OpenShift
To enable the pipeline to run on OpenShift we need to pass it the associated kubernetes resources
-
volumes
-
environment variables
-
node selectors, taints and tolerations
Volumes
Our pipeline requires a number of volumes to be created and mounted into the executing pods. The volumes are primarily used for storage and secrets handling but can also be used for passing configuration files into the pods.
Before mounting the volumes into the pods they need to be created. The following code creates two volumes, one from a pre-existing PVC and another from a pre-existing secret.
vol = V1Volume(
    name='batterydatavol',
    persistent_volume_claim=V1PersistentVolumeClaimVolumeSource(
        claim_name='batterydata',)
    )
mqttcert = V1Volume(
    name='mqttcert',
    secret=V1SecretVolumeSource(
        secret_name='mqtt-cert-secret')
    )
The volumes are mounted into the containers using the add_pvolumes method:
inference_result = inference_model_op(data_path="/opt/data/pitstop/",paramater_data=inference_prep.outputs["parameter_data"],experiment_name=trigger_data.output,vin=VIN)
inference_result.add_pvolumes({"/opt/data/pitstop": vol})
inference_result.add_pvolumes({"/opt/certs/": mqttcert})
Environment Variables
Environment variables can be added to the pod using the add_env_variable method.
trigger_data = load_trigger_data_op(file_obj, src_bucket,file_destination)
trigger_data.add_pvolumes({"/opt/data/pitstop/": vol})
trigger_data.add_env_variable(V1EnvVar(name='s3_host', value='http://rook-ceph-rgw-ceph-object-store.openshift-storage.svc:8080'))
trigger_data.add_env_variable(env_from_secret('s3_access_key', 's3-secret', 'AWS_ACCESS_KEY_ID'))
trigger_data.add_env_variable(env_from_secret('s3_secret_access_key', 's3-secret', 'AWS_SECRET_ACCESS_KEY'))
|
The env_from_secret utility method also enables extracting values from secrets and mounting them as environment variables. In the example above the AWS_ACCESS_KEY_ID value is extracted from the s3-secret secret and added to the container defintion as the s3_access_key environment variable. |
Node Selectors, Taints and Tolerations
Selecting the correct worker node to execute a pipeline step is an important part of pipeline development. Specific nodes may have dedicated hardware such as GPUs; or there may be other constraints such as data locality.
In our example we’re using the nodes with an attached GPU to execute the step. To do this we need to:
-
Create the requisite toleration:
gpu_toleration = V1Toleration(effect='NoSchedule', key='nvidia.com/gpu', operator='Equal', value='true') -
Add the toleration to the pod and add a node selector constraint.
prep_train_data = prep_train_data_op(data_path="/opt/data/pitstop/",epoch_count=epoch_count,experiment_name=trigger_data.output,run_mode=0).after(trigger_data)
prep_train_data.add_pvolumes({"/opt/data/pitstop": vol})
prep_train_data.add_node_selector_constraint(label_name='nvidia.com/gpu.present',value='true')
prep_train_data.add_toleration(gpu_toleration)
|
You could also use this approach to ensure that pods without GPU needs are not scheduled to nodes with GPUs. For global pipeline pod settings take a look at the PipelineConf class in the 'KFP SDK Documentation. |
|
We have only covered a subset of what’s possible with the KFP SDK. It is also possible to customise significant parts of the pod spec definition with:
See the the KFP SDK Documentation for more details. |
Compiling to Tekton
As stated previously, DSP Python scripts need to be compiled into Tekton definitions for execution. This can be achieved in multiple ways:
-
Explicity calling the "dsl-compile" command from the kfp Python package giving the input and output files, then uploading the resultant yaml file to the DSP server via the UI.
-
Adding the compile step to the Python script and then uploading the resultant yaml file to the DSP server via the UI.
-
Adding the compile step to the Python script and uploading the resulting Tekton definition via an api call.
In our example we’ve chosen the second option:
compiler.compile(edgetest_pipeline, __file__.replace('.py', '.yaml'),tekton_pipeline_conf=pipeline_conf)
The Tekton compiler also has a number of global settings, which are not covered here, see here for more details.
|
We have only covered a subset of the functionality avaiable in DSP as it pertains to our real-life scenario. Please see the kfp-tekton features document for more advanced functionality. The KFP Tekton Advanced User Guide also has more information. |
Pipeline Execution
Submitting a Pipeline and Triggering a run
The following code demonstrates how to submit and trigger a pipeline run from a Red Hat OpenShift AI WorkBench.
if __name__ == '__main__':
    kubeflow_endpoint = 'http://ds-pipeline-pipelines-definition:8888'
    sa_token_file_path = '/var/run/secrets/kubernetes.io/serviceaccount/token'
    with open(sa_token_file_path, 'r') as token_file:
        bearer_token = token_file.read()
    print(f'Connecting to Data Science Pipelines: {kubeflow_endpoint}')
    client = TektonClient(
        host=kubeflow_endpoint,
        existing_token=bearer_token
    )
    result = client.create_run_from_pipeline_func(
        offline_scoring_pipeline,
        arguments={},
        experiment_name='offline-scoring-kfp'
    )
Externally Triggering a DSP pipeline run
In our real-world example above the entire pipeline is executed when a file is added to an S3 bucket. Here is the process followed:
-
File added to S3 bucket.
-
S3 triggers the send of a webhook payload to an OCP Serverless function.
-
The Serverless function parses the payload and invokes the configured DSP pipeline.
We’re not going to go through the code and configuration for this, but here is the code to trigger the pipeline.
def kubeflow_handler(kfp_host:str, kfp_name:str,file_obj:str, src_bucket:str)->None:
    print('kubeflow_handler...Connecting to kubeflow API.....',kfp_host)
    client = kfp.Client(host=kfp_host)
    print('Connecting to kubeflow API.....connected')
    v1 = src_bucket.split(".")
    bucket_name = v1[2]
    pipline_id  = client.get_pipeline_id(kfp_name)
    if pipline_id is None:
        print("No pipeline found with name ",kfp_name)
    else:
        try :
            exp_obj = client.get_experiment(experiment_id="EdgeTestMonitoringExperiment")
        except:
            exp_obj = client.create_experiment("EdgeTestExperiment","monitoring experiment")
        params_dict = dict(file_obj= file_obj, src_bucket = bucket_name)
        run = client.run_pipeline(exp_obj.id,"edgetest monitor run @ "+str(time.asctime()), pipeline_id = pipline_id,params=params_dict)
        print("Pipleline Run submitted ",run.id, run.pipeline_spec.parameters)
    print('kubeflow_handler.....finish')
The full code is here.
|
The pipeline needs to have already been submitted to the DSP runtime. |
Data Handling in Data Science Pipelines
DSP have two sizes of data, conviently named Small Data and Big Data.
-
Small Data is considered anything that can be passed as a command line argument for example Strings, URLS, Numbers. The overall size should not exceed a few kilobytes.
-
Unsurprisingly, everything else is considered Big Data and should be passed as files.
Handling large data sets
DSP support two methods by which to pass large data sets aka Big Data between pipeline steps:
-
Tekton Workspaces.
-
Volume based data passing method.
|
The Data Science Projects Data Connection S3 storage is used to store Output Artifacts and Parameters of the stages of a pipeline. It is not intended to be used to pass large amounts of data between pipeline steps. |
Tekton Workspaces
This uses the native Tekton mechanism for storing and passing data between stages of a Tekton Pipeline. Tekton creates a Workspace to share large data files among tasks that run in the same pipeline. These Workspaces are backed by dynamically created storage volumes which are removed once the pipeline has completed.
By default the storage is set to ReadWriteMany, the size is set to 2Gi and uses the storage class called kfp-csi-s3.
However, this can be changed to suit the target environment needs by setting the following Environment Variables:
-
DEFAULT_ACCESSMODES
-
DEFAULT_STORAGE_SIZE
-
DEFAULT_STORAGE_CLASS
An example of this in the Sample Pipeline is shown below:
    os.environ.setdefault("DEFAULT_STORAGE_CLASS","managed-csi")
    os.environ.setdefault("DEFAULT_ACCESSMODES","ReadWriteOnce")
    os.environ.setdefault("DEFAULT_STORAGE_SIZE","10Gi")
Volume-based data passing method
This approach uses a pre-created OpenShift storage volume (aka PVC) to pass data between the pipeline steps. An example of this is in the KFP compiler tests which we will discuss here.
First create the volume to be used and assign it to a variable:
from kubernetes.client.models import V1Volume, V1PersistentVolumeClaimVolumeSource
from kfp.dsl import data_passing_methods
volume_based_data_passing_method = data_passing_methods.KubernetesVolume(
volume=V1Volume(
name='data',
persistent_volume_claim=V1PersistentVolumeClaimVolumeSource(
claim_name='data-volume',),
),
path_prefix='artifact_data/',
)Then add definition to the pipeline configuration:
if __name__ == '__main__':
    pipeline_conf = kfp.dsl.PipelineConf()
pipeline_conf.data_passing_method = volume_based_data_passing_method|
The data-volume PVC claim needs to exist in the OpenShift namespace while running the pipeline, else the pipeline execution pod fails to deploy and the run terminates. |
To pass big data using cloud provider volumes, it’s recommended to use the volume-based data passing method.
Data Science Pipeline - Hands On Example
We’re now going to deploy and run a sample pipeline. The use case is identifying fraudulent transactions among a large number of credit card transactions using an offline scoring approach.
Setup
-
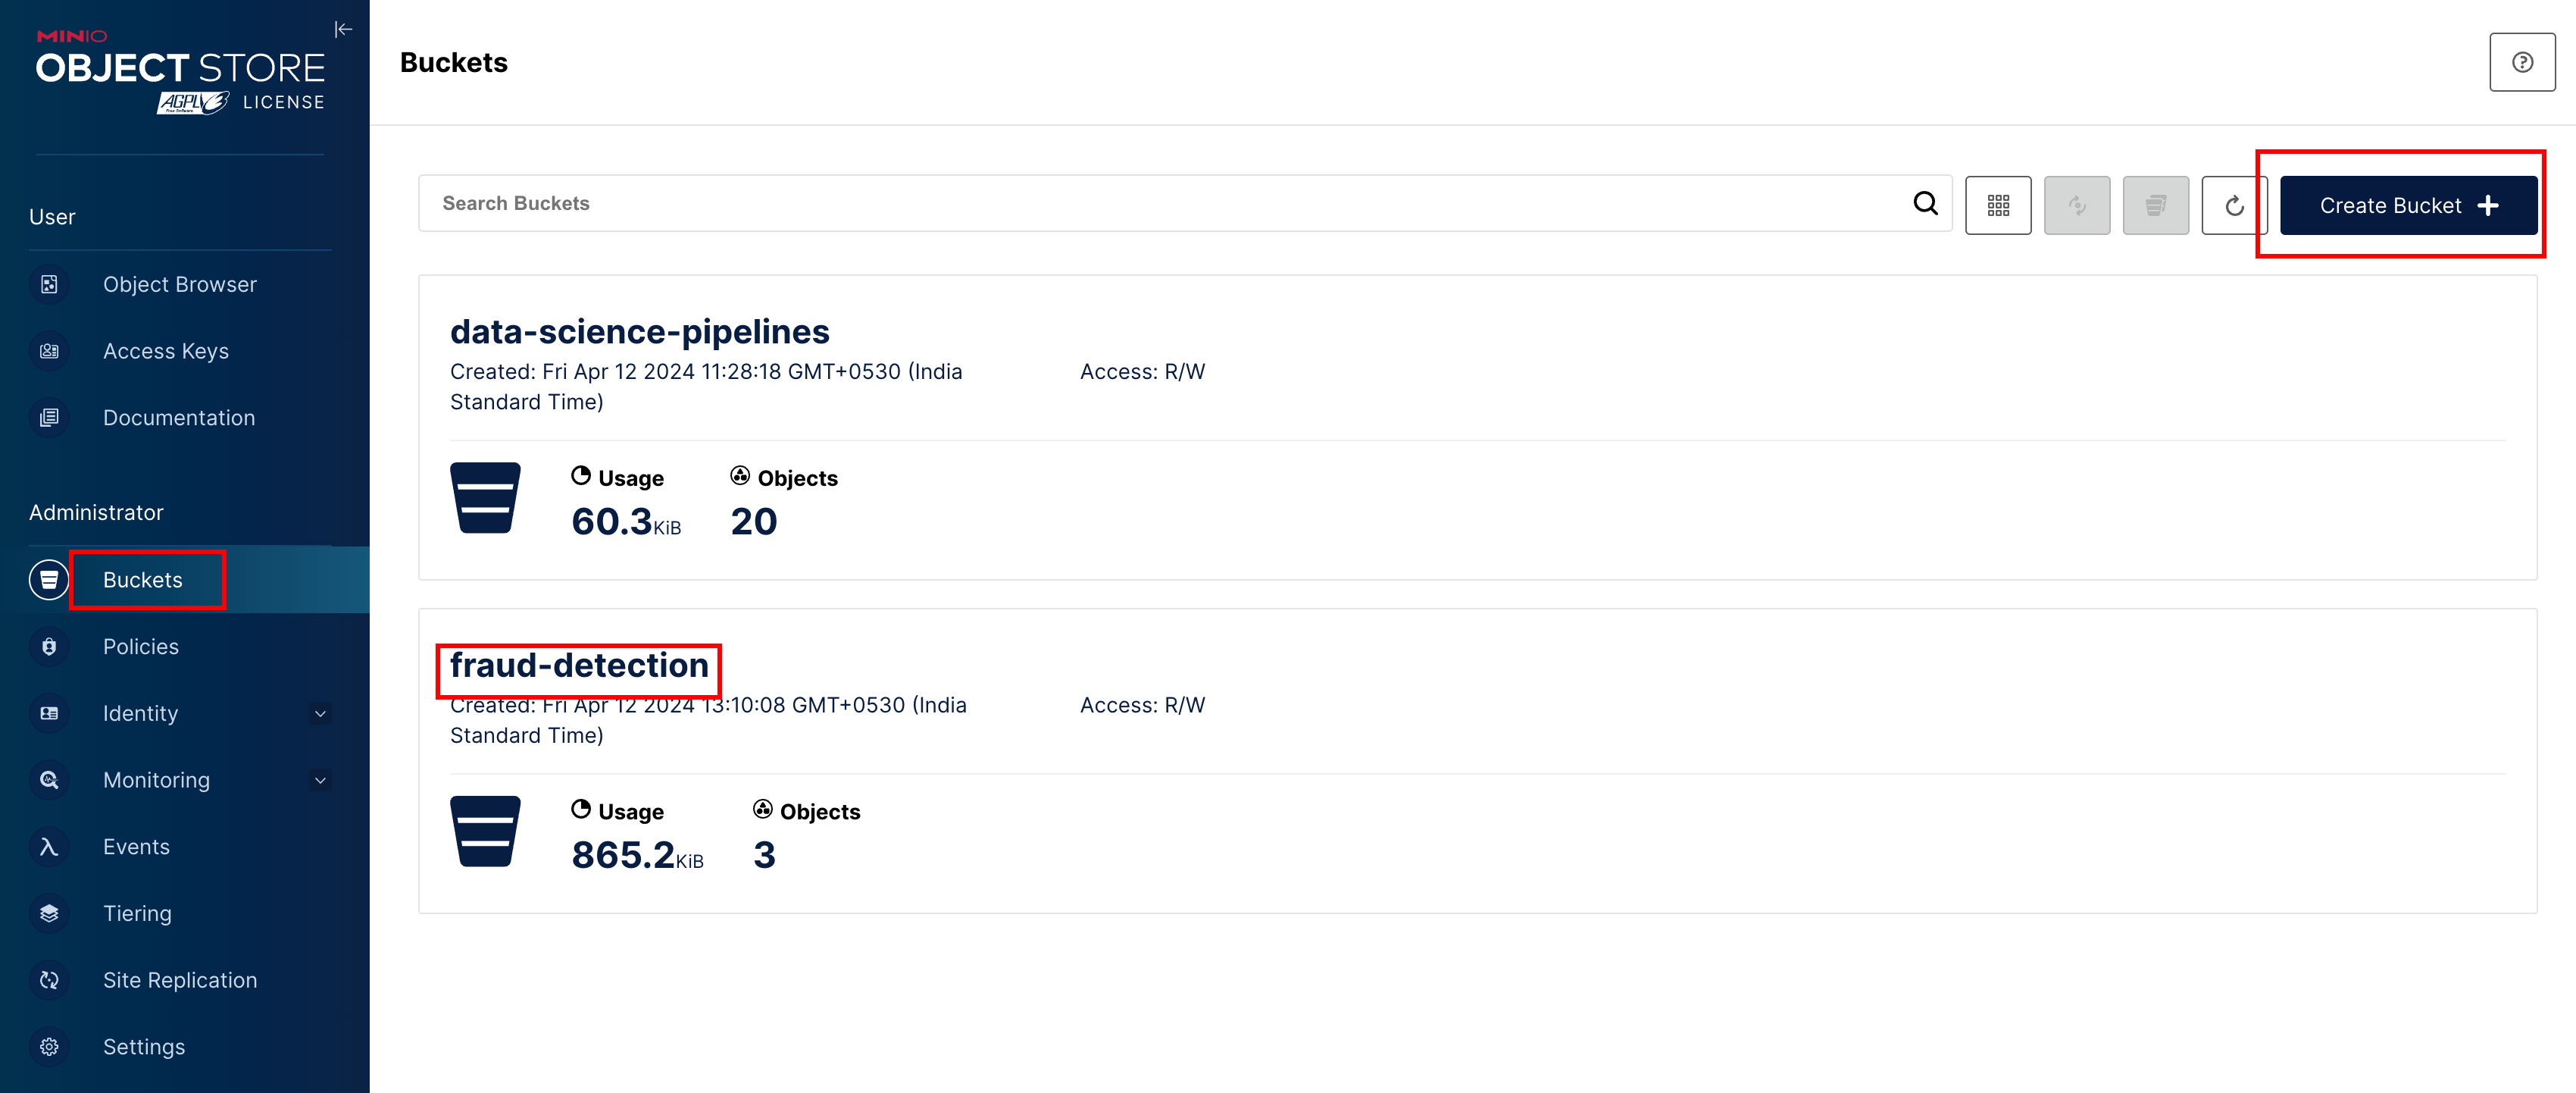
Using the Minio UI, create a new S3 Bucket named fraud_detection_bucket.
-
Download the following artifacts:
-
Uncompress the .gz files using the
gzip -dcommand. -
Upload the files to S3 fraud_detection_bucket via the Minio UI.
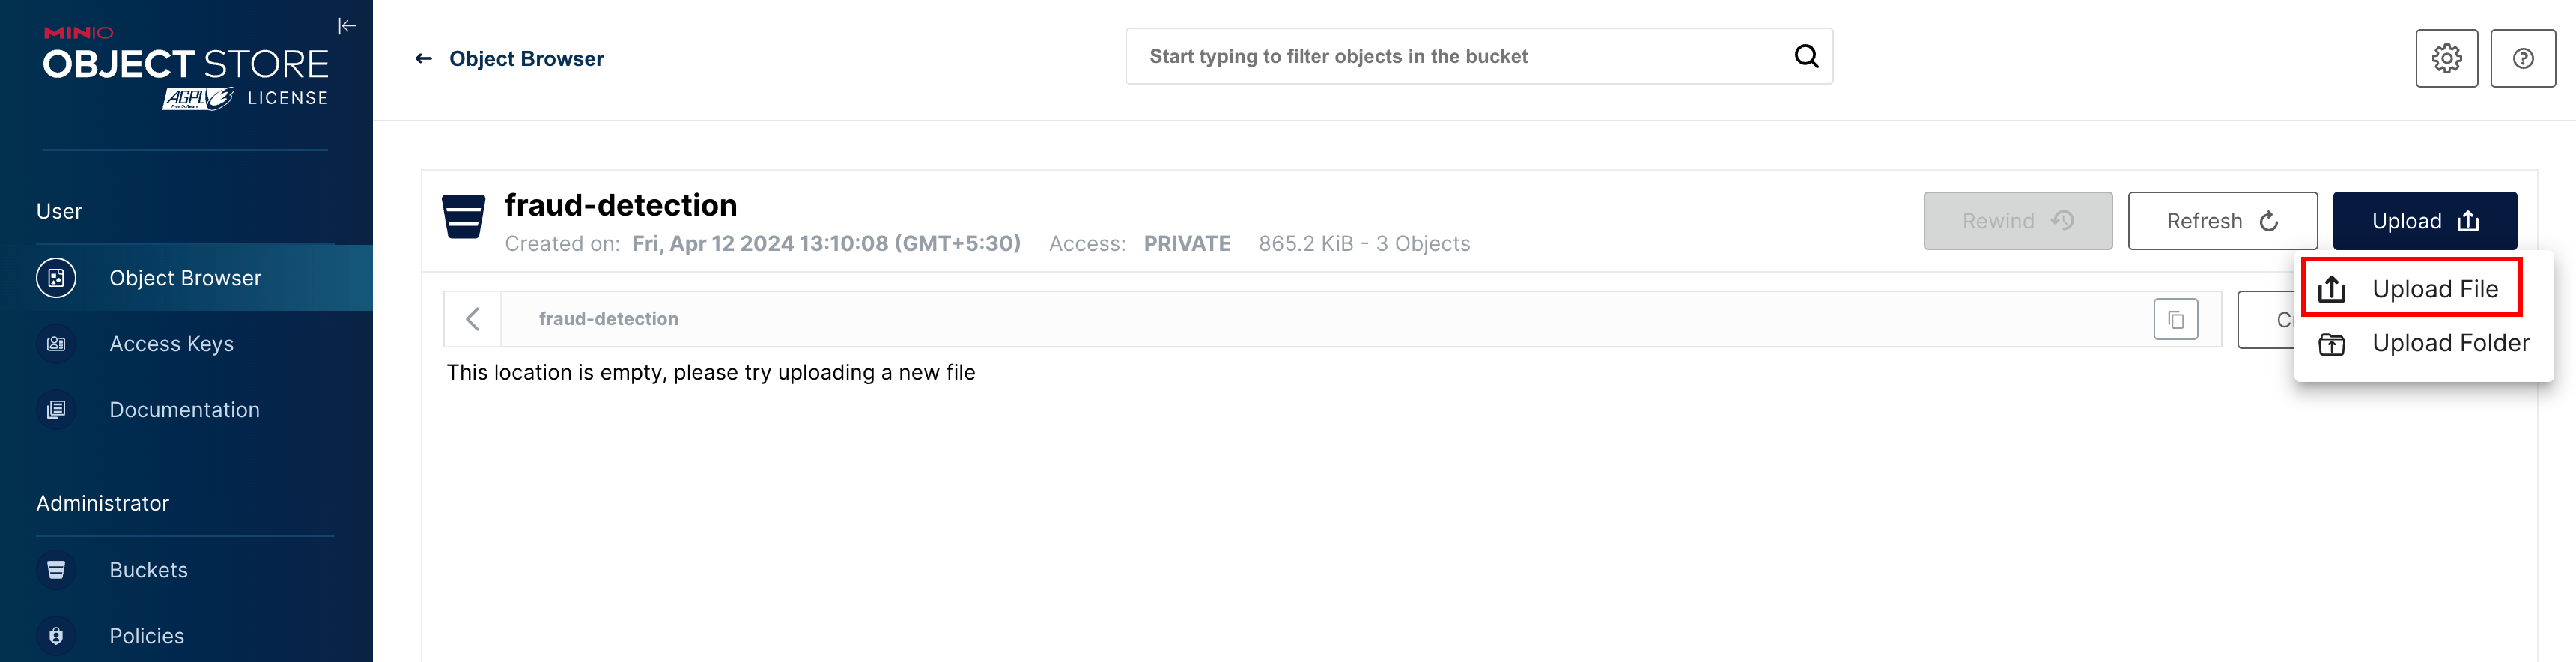
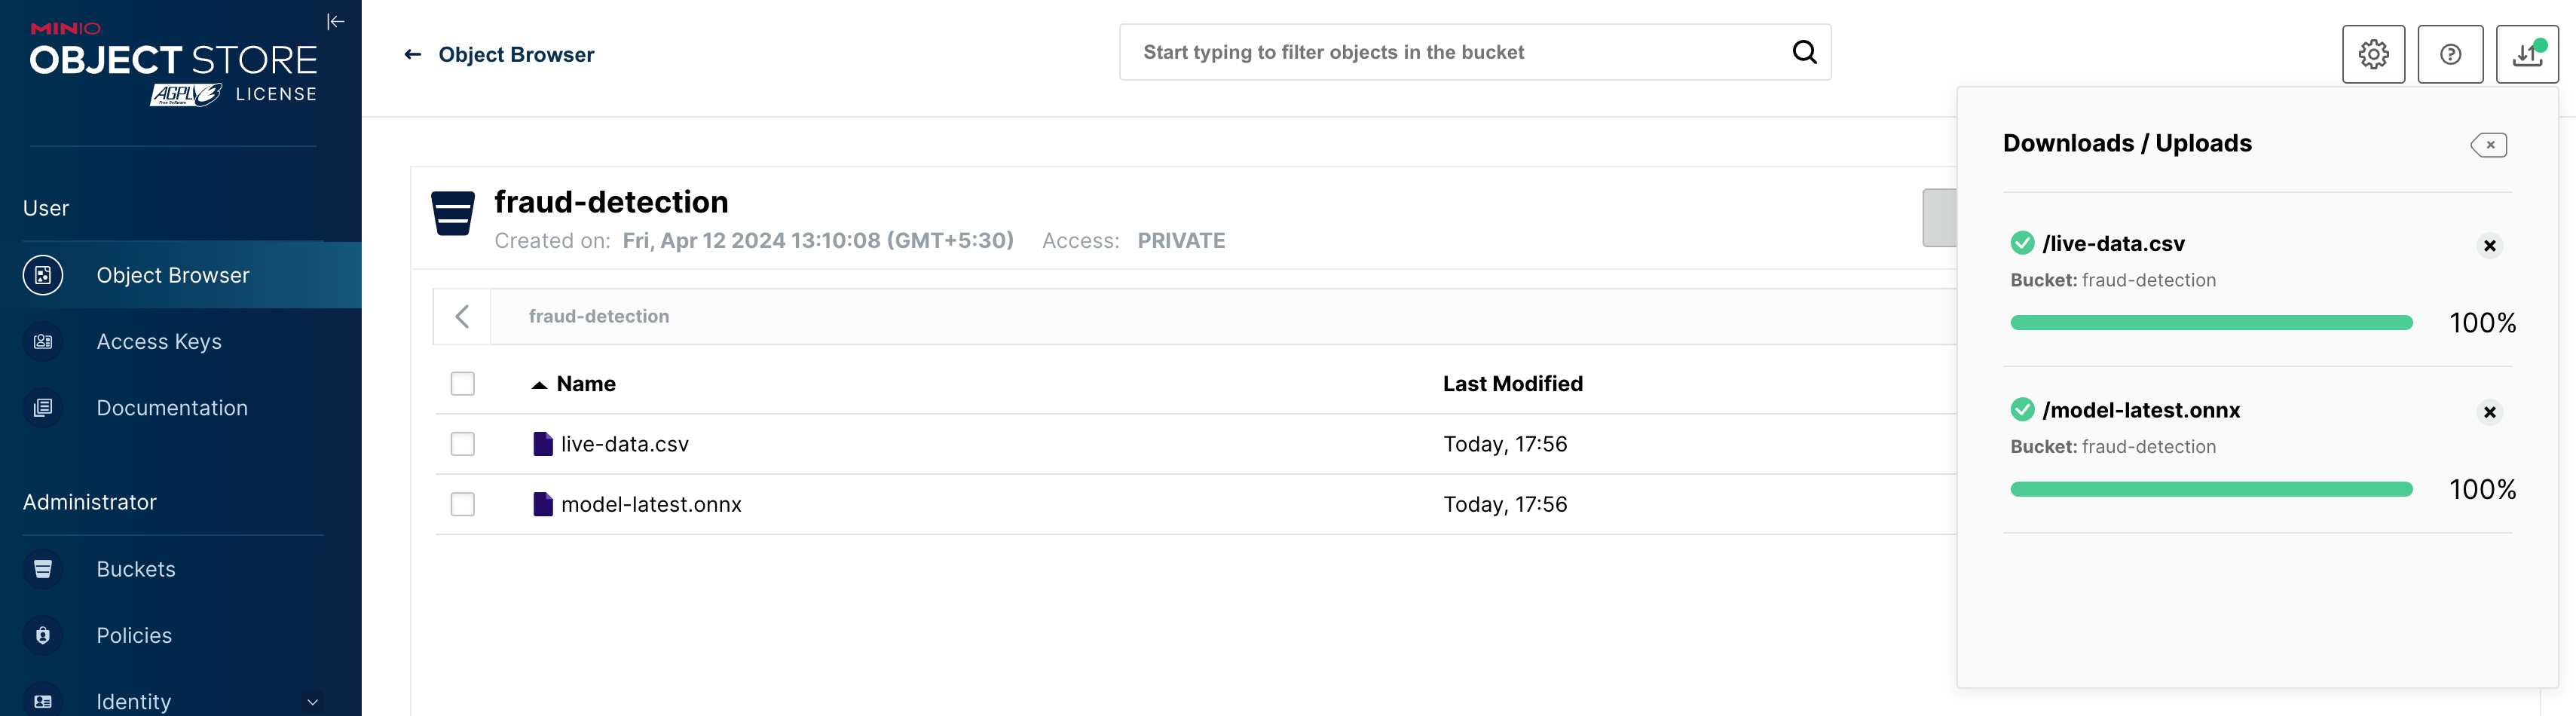
-
Create the aws-connection-fraud-detection secret containing the S3 bucket name, endpoint and credentials.
oc create secret generic aws-connection-fraud-detection --from-literal=AWS_ACCESS_KEY_ID=minio --from-literal=AWS_DEFAULT_REGION=rhods-enablement-emea --from-literal=AWS_S3_BUCKET=fraud-detection-bucket --from-literal=AWS_S3_ENDPOINT=https://minio-api... --from-literal=AWS_SECRET_ACCESS_KEY=minio123-
Create two OpenShift Persistent Volumes with the following names:
-
offline-scoring-model-volume
-
offline-scoring-data-volume
-
| Example PVC definitions are here, download and customise as necessary this Data Volume definition & Model Volume definition |
Execute Pipeline
Download and customise as necessary this Example Pipeline definition
-
Create a Workbench with the name fraud-onnx
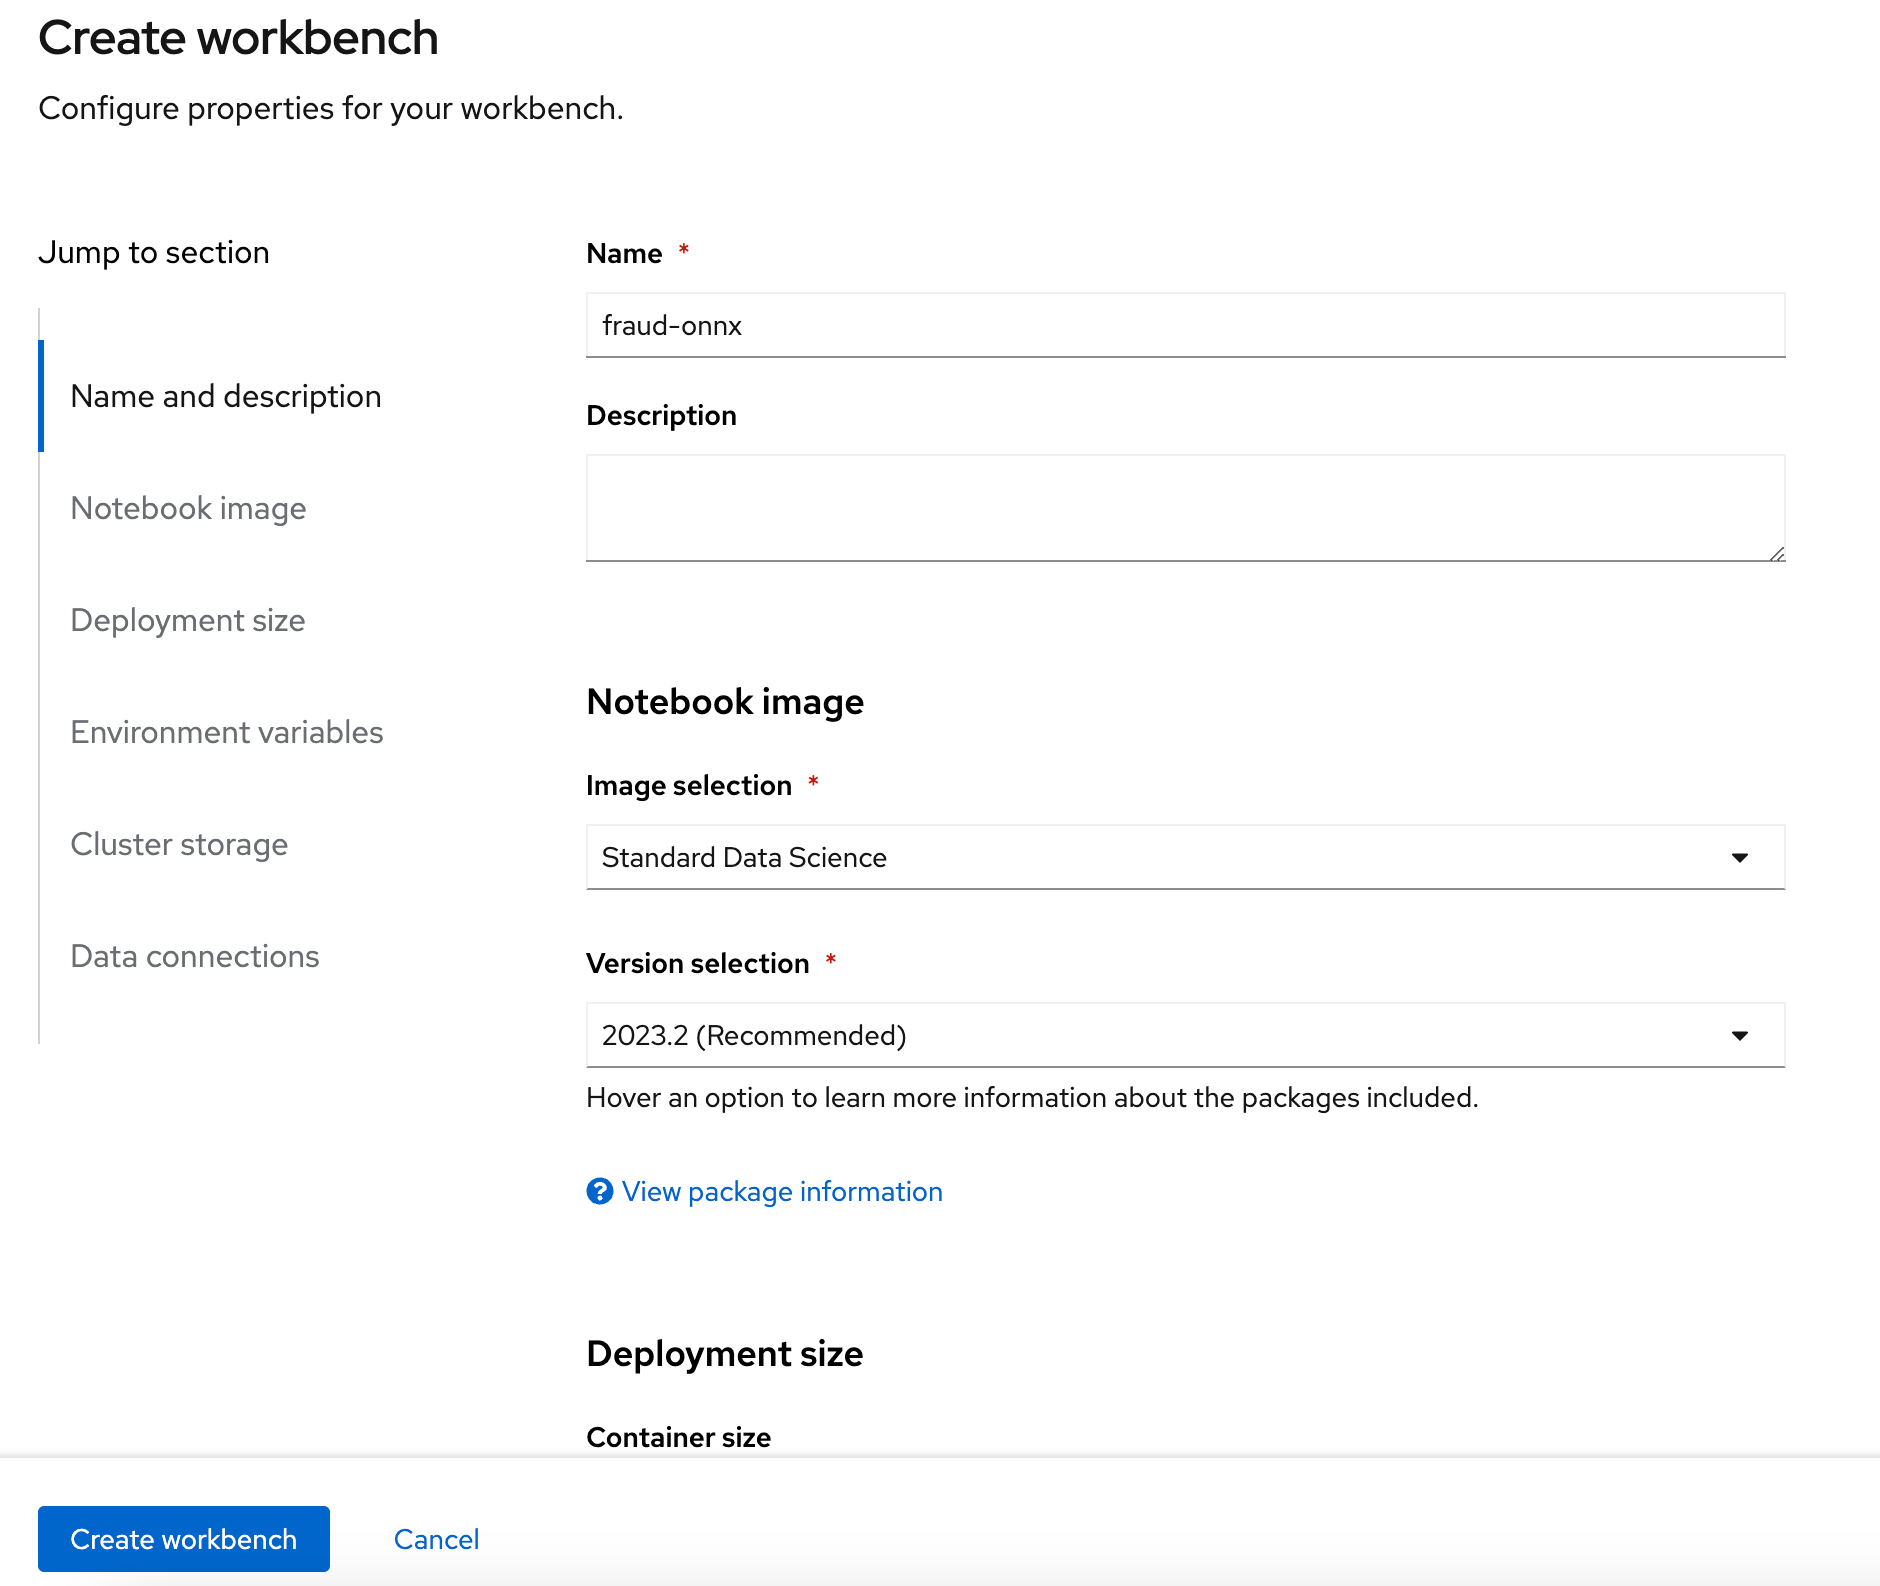
-
Download the Offline Scoring Pipeline and load it into your workbench.
-
Click 'Restart Kernel and Run All Cells'.
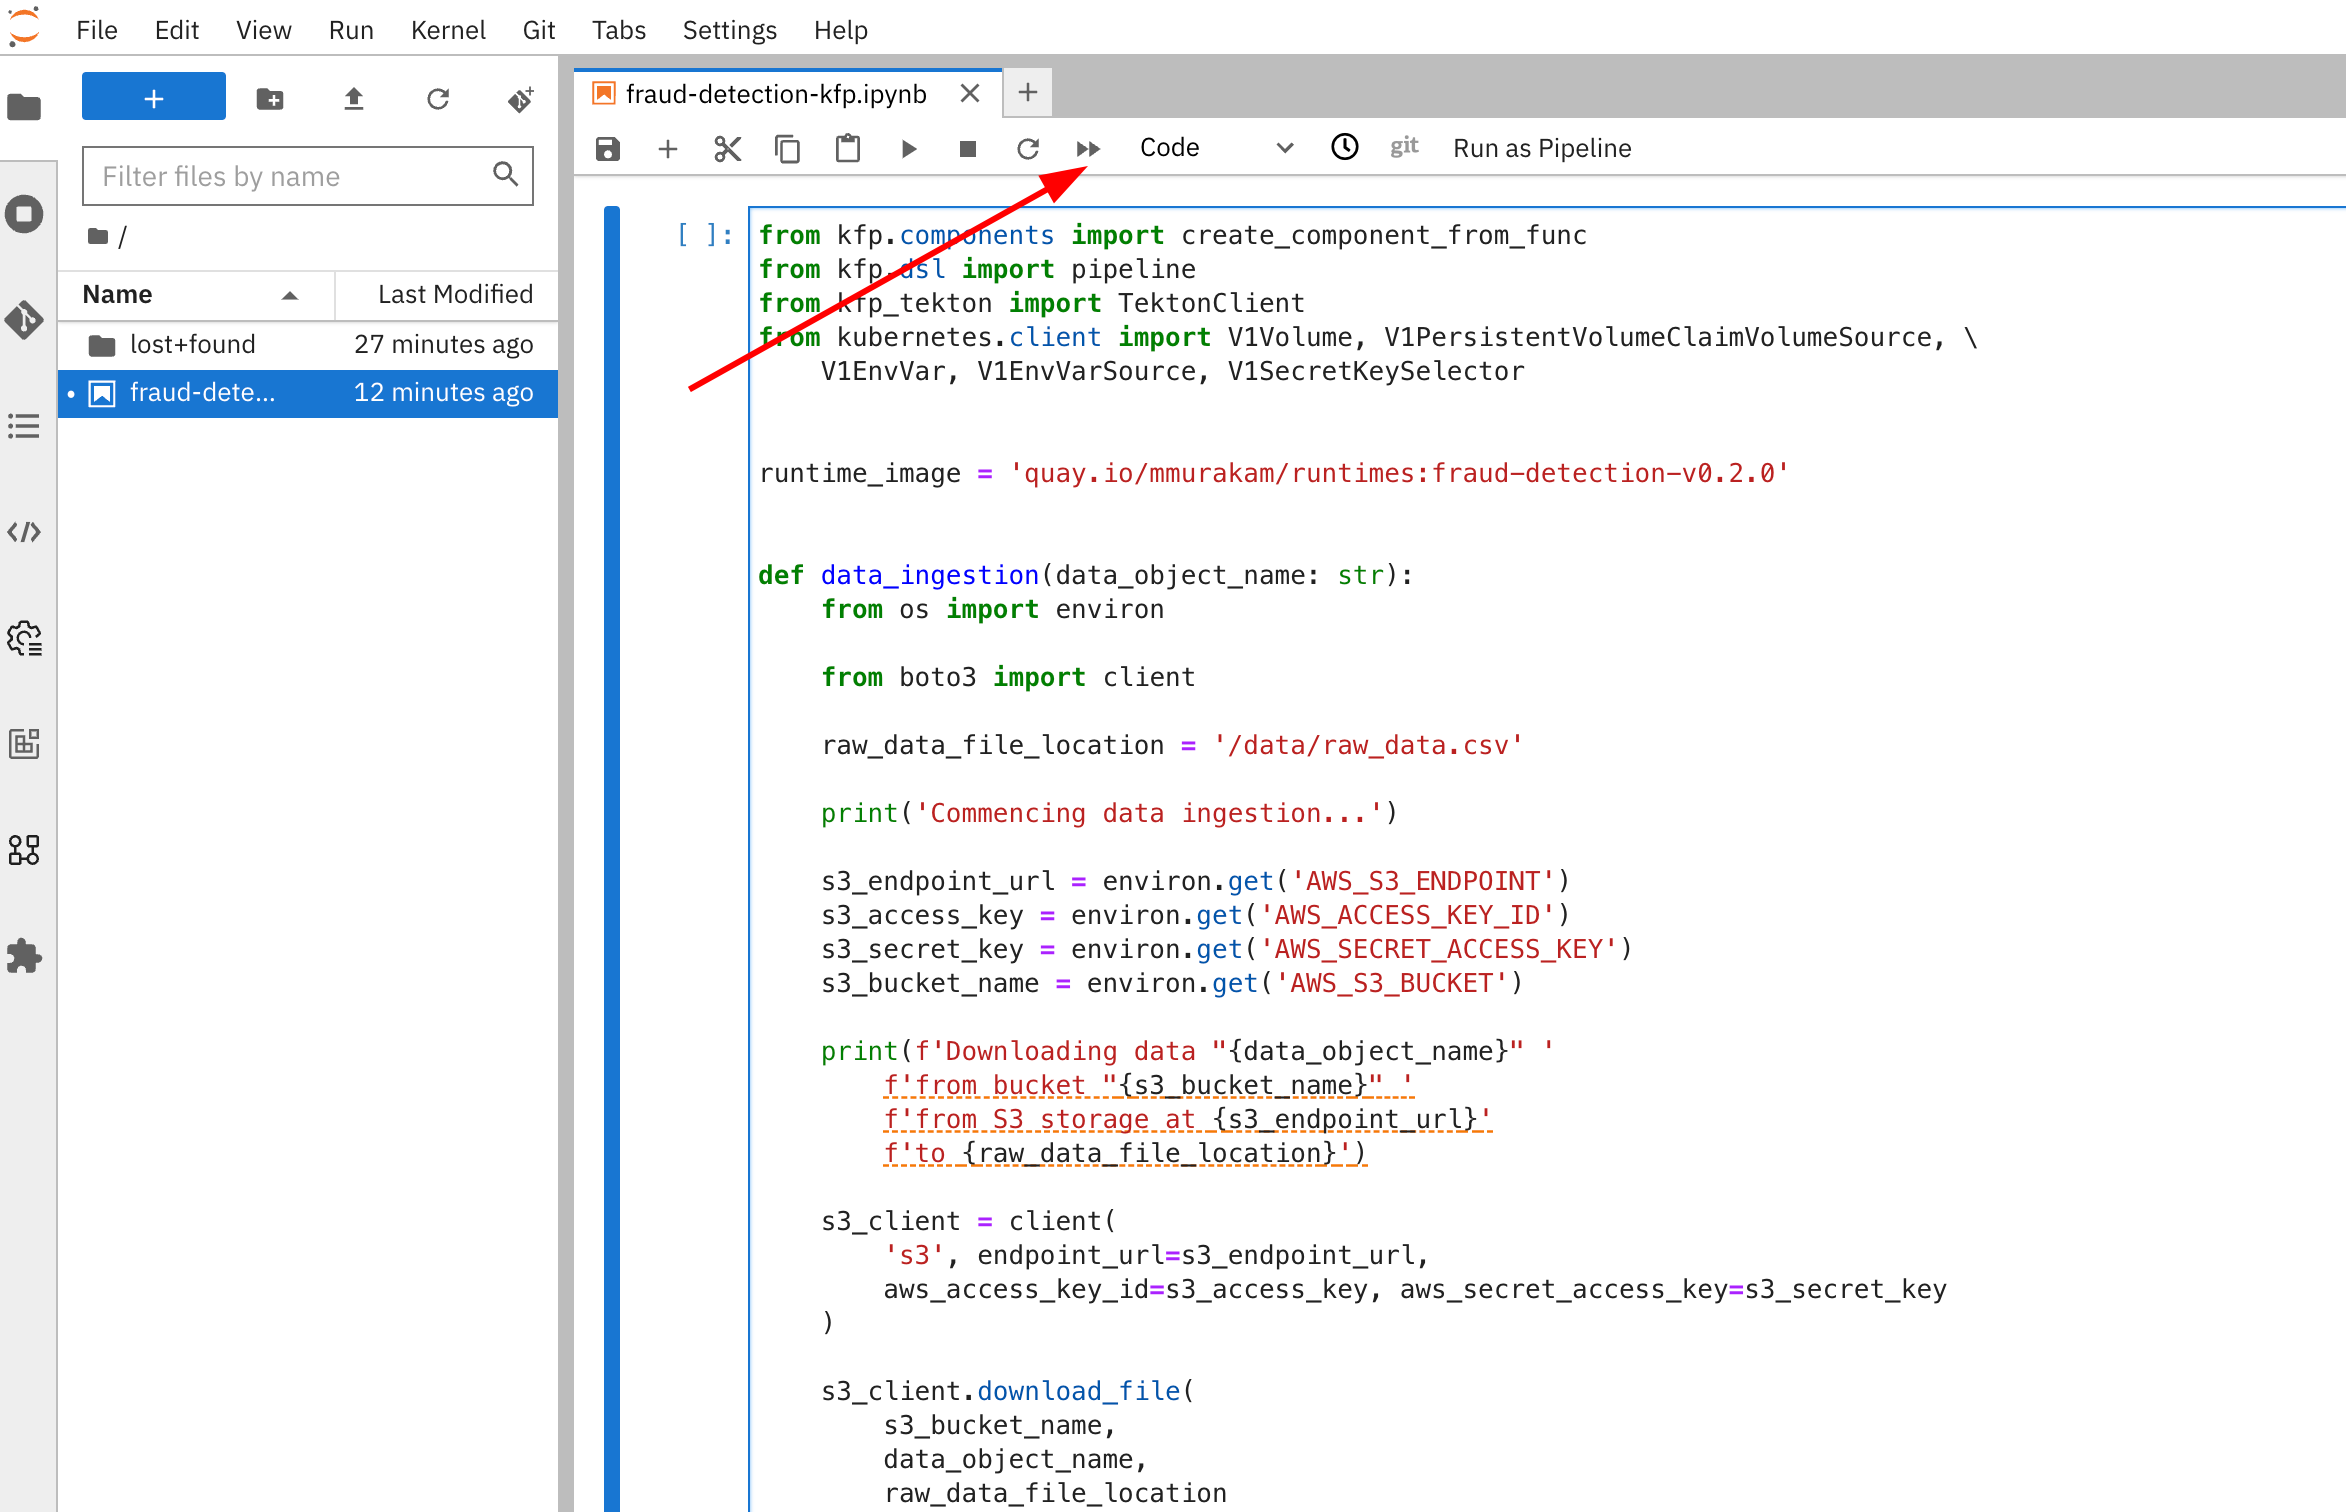
The Pipeline will be submitted to the server and a run Triggered.
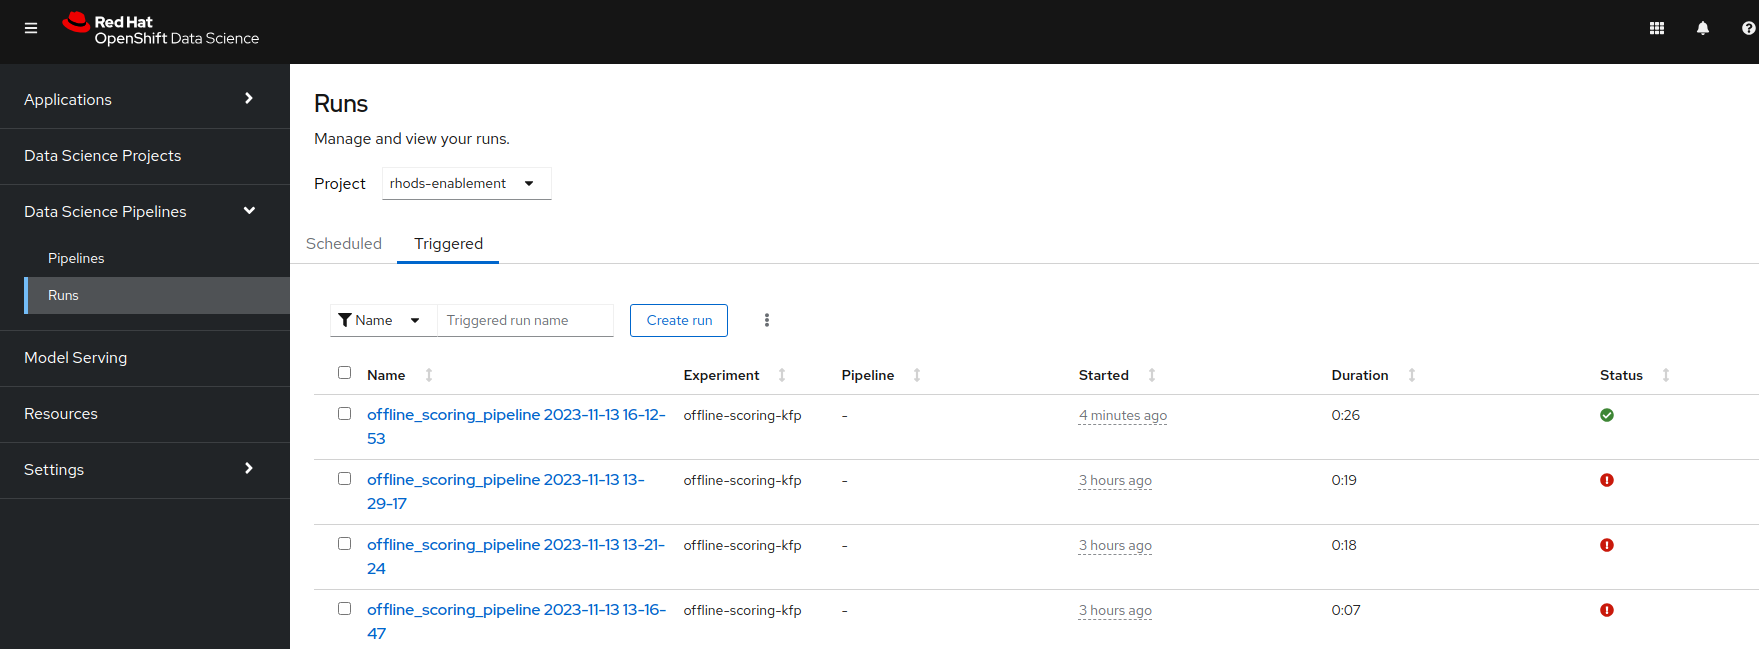
If the pipeline run was executed without any issues, you should see something similar to below:
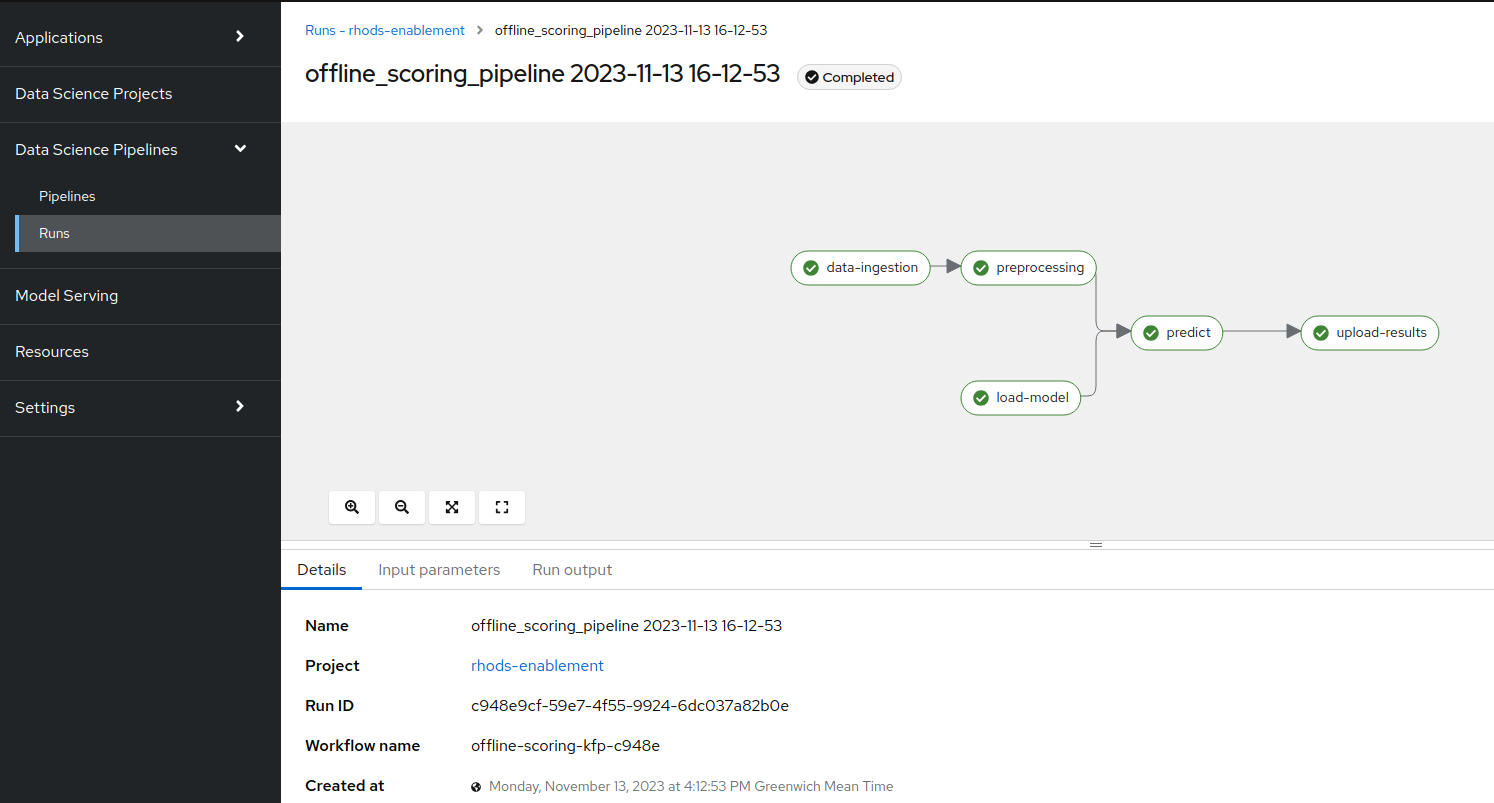
Handling Pipeline Errors
In case the pipeline fails, the UI shows something similar to the following:
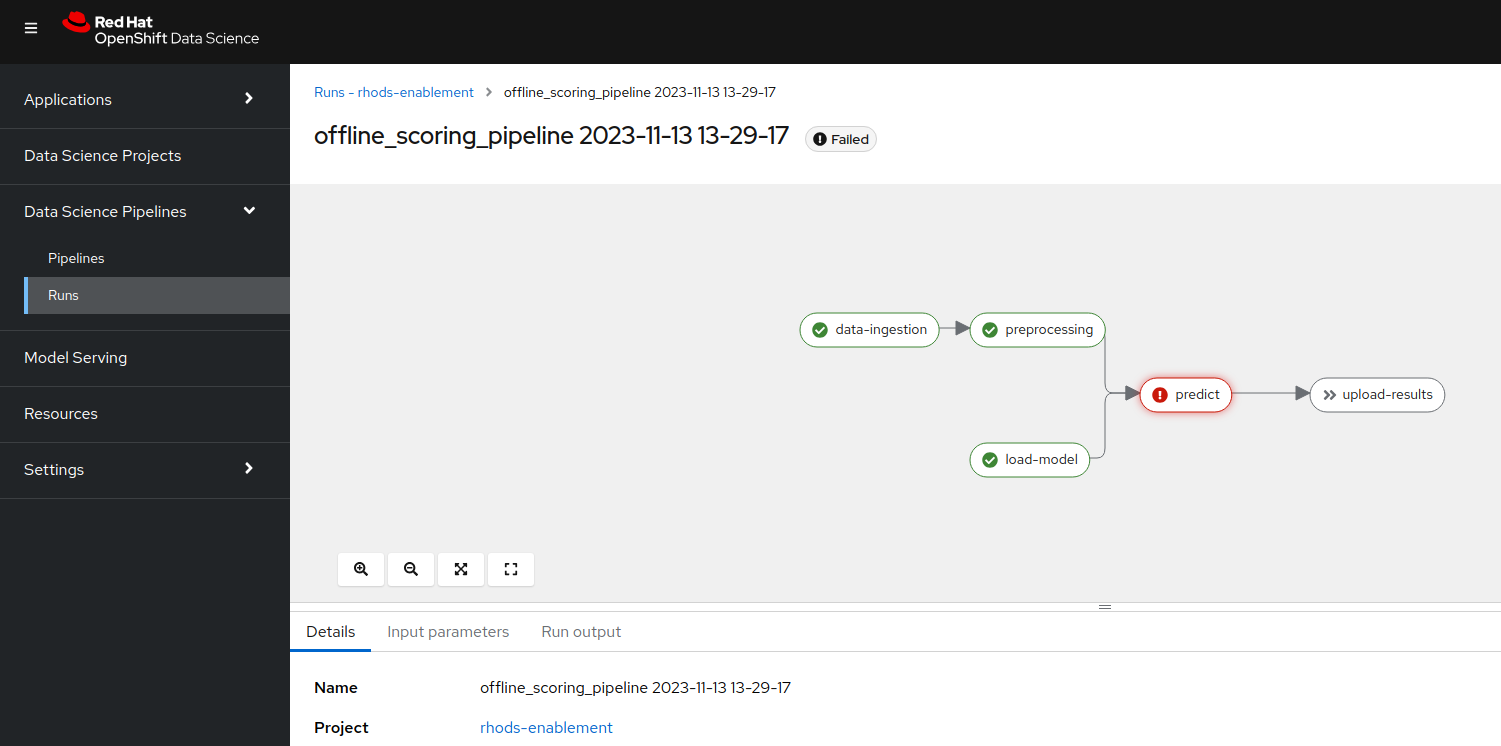
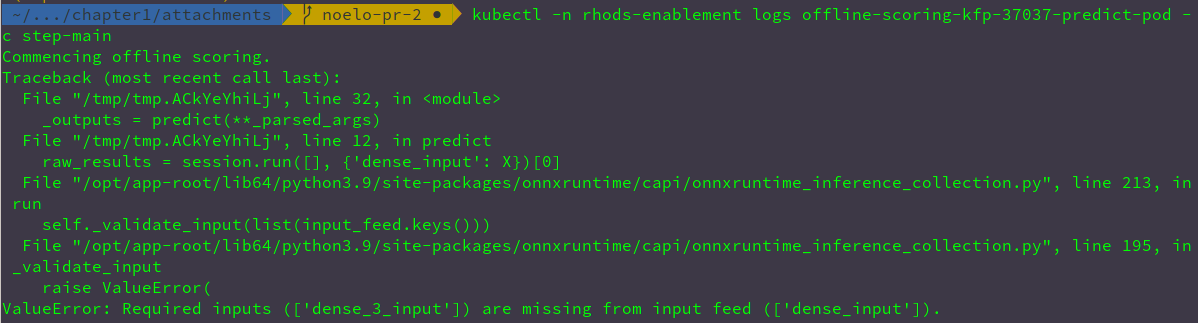
Clicking on the failed node in the graph and then clicking on the Details tab presents the status of the execution step. When the mouse is placed over the Status field, the command to retrieve the detailed logs of the execution step is displayed.
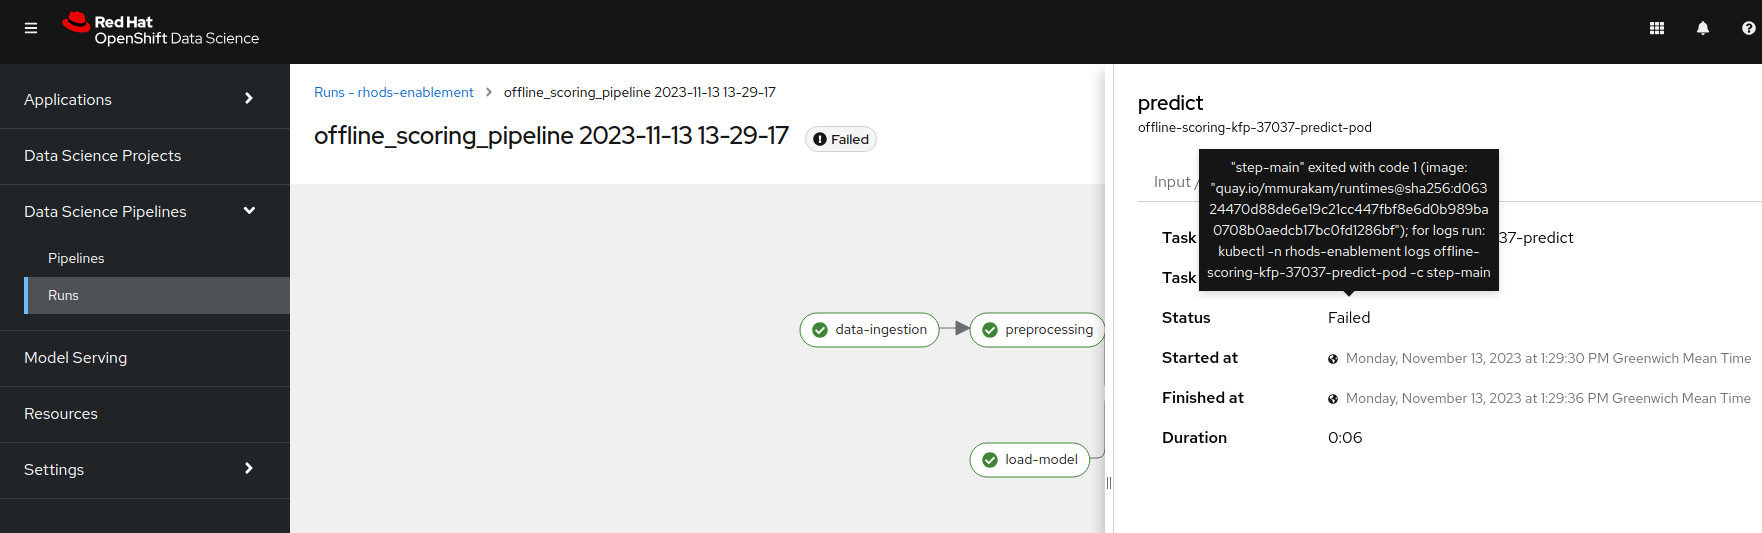
The step logs can then be viewed using the command provided.