OpenStack User Interfaces
Estimated reading time: 13 minutes.
- Objective
-
Describe the tools that enable OpenStack Operators to access OpenStack clusters to deploy and manage applications.
Tools for OpenStack Administrators
As we learned in previous sections, an OpenStack Administrator manages application workloads and related virtual resources, such as servers, networks, and storage, using the OpenStack APIs. To access those APIs, Red Hat OpenShift on OpenStack provides two main tools:
- The OpenStack Client
-
It is a command-line tool that provides a thin layer on the APIs of multiple OpenStack services. As a single client for multiple services, it might include commands for services that are not supported by Red Hat OpenStack or that are not enabled in a particular cluster.
- The Horizon Dashboard
-
It is a web application provided by an OpenStack service, so it runs in the control plane. It provides easier workflows for Operators and Administrators but may not include all OpenStack services, or may not support all APIs of the included services.
Despite the rich features of the Horizon web UI, it is expected that an OpenStack Operator is comfortable using an operating system prompt, most likely a Bash shell from Linux. There are tasks that absolutely require using the OpenStack client and Horizon is not designed to be a full-service tool for Operations and Administrators, but focuses on the most frequent tasks and on workflows where graphical user interfaces can provide significant advantages over CLI workflows.
Using The OpenStack Client
The OpenStack client provides a unified command-line interface (CLI) for multiple OpenStack services with a uniform command structure. You invoke the OpenStack client by running the openstack command.
The OpenStack client can be installed in Windows and MacOS, besides multiple Linux distributions, by using native operating system packages or by using the Python package installer pip.
OpenStack Client Command Syntax
Follows the general syntax of the openstack command. The dollar sign ($) represents an operating system shell prompt and is not part of the command.
$ openstack [global options] resource action [arguments]A resource, sometimes called an object by OpenStack upstream documentation, is anything that can be managed by OpenStack services. It is not the name nor the identifier of an individual resource instance, but the name of a resource type.
In this learning journey, we prefer the term "resource" over "object" to avoid confusion with the OpenStack resource type called object.
|
Most OpenStack services manage multiple types of resources and the name of a resource type can be composed of multiple words, separated by spaces, which is something a Linux sysadministrator is not used to.
The following are some of the resource types recognized by the OpenStack client. Later in the learning journey, you will learn what these resource types represent and which actions you can perform on them:
-
availability zone -
console url -
floating ip -
network -
volume -
server -
security group
An action corresponds to an OpenStack API performed on the resource and it can take many optional or required arguments.
The OpenStack client defines the meaning of some standard actions to enforce consistency among multiple services and their resources. The following are some of the standard actions, but not all resource types will accept all standard actions. Later during this learning journey, you will learn what each action means:
-
create -
add -
set -
remove -
show -
unset -
delete
The previous list might seem that all or most actions are single words, but any resource can define a non-standard action composed of multiple words. Besides, single-word actions are usually extended with a resource type to produce a multiple-word action, for example:
-
add volume -
remove floating ip
The arguments to an action can be resource names, resource identifiers, or command-line options using the GNU GetOps conventions. When there are multiple arguments, order does not matter, but the value of a command-line option must follow its option, separated by either a space or an equals sign (=).
The global options look like arguments, because they also follow standard GNU Getops conventions, but they have the same meaning for all resources and actions. They usually set authentication and login parameters.
OpenStack Client Command Examples
The following are simple examples of complete OpenStack client commands which take no arguments:
$ openstack server list
$ openstack floating ip list
$ openstack versions show| Do not try these commands on your OpenStack cluster, unless you know which resource names to use and appropriate values for other arguments. |
The following are examples of commands which require other arguments that are the name of other resources. These names are formatted in italics to indicate they should be changed to match the resources defined in your cluster:
$ openstack floating ip create external-network
$ openstack server add floating ip dbserver 192.168.0.12
$ openstack server remove volume dbserver datadisk
$ openstack server delete dbserver
The following are examples of commands which require arguments in addition to names of resources:
$ openstack volume create datadisk --size 10G --read-write
$ openstack volume set appdisk --bootable --readonly
In the previous openstack volume create command, the argument 10G is not the name of any resource, but it is in italics because it’s a value that can change, while the arguments --size and --read-write must be typed exactly as they are.
Most of the times, the order of arguments make no difference. We recommend that you put resource names first, and other arguments later, because this makes it easier to use the command-line history of your operating system command shell to change previous commands, for example changing a create to a show command.
But, if you prefer the traditional GNU style of typing all options first and non-option arguments later, you could rewrite the latest two examples as:
$ openstack volume create --read-write --size 10G datadisk
$ openstack volume set --readonly --bootable appdisk
Online Help From the OpenStack Client
To list all commands availabe in your OpenStack client, use the --help global option:
$ openstack --helpThe commands you see are actually the concatenation of all resource types with all actions known by the OpenStack client for each resource type.
To list the purpose and arguments of individual commands, use the help command:
$ openstack help create volumeUsing the Horizon Dashboard
The OpenStack Horizon project provides a dashboard for cloud end users, that is, OpenStack Operators, to manage application resources such as server instances, networks, and volumes. It also enables a few OpenStack Administrator tasks which you will learn in more detail on the courses of the OpenStack administration learning journey.
Because Horizon is an OpenStack service, it is typically enabled as part of OpenStack cluster provisioning and is immediately available for remote access, without the need to install nor configure anything on the OpenStack Operator workstation.
Navigating the Horizon Web Interface
| This section may need extensive rewrites and new screenshots because of changes in the look and feel and layout of Horizon between RHOSP 16 and RHOSO 18. |
The Horizon web UI consists of two rows of menus at the top, and a third row with tabs that depend on the last menu item that was selected. The remaining web page is dedicated to displaying information from the current tab.
The following figure shows an example of the Horizon dashboard for an OpenStack Operator user, displaying the Project / Compute / Overview page. The path starts with the selection of the topmost row (Project), then the selection of the second row, from top to bottom (Compute), and finally the tab on the third row (Overview).
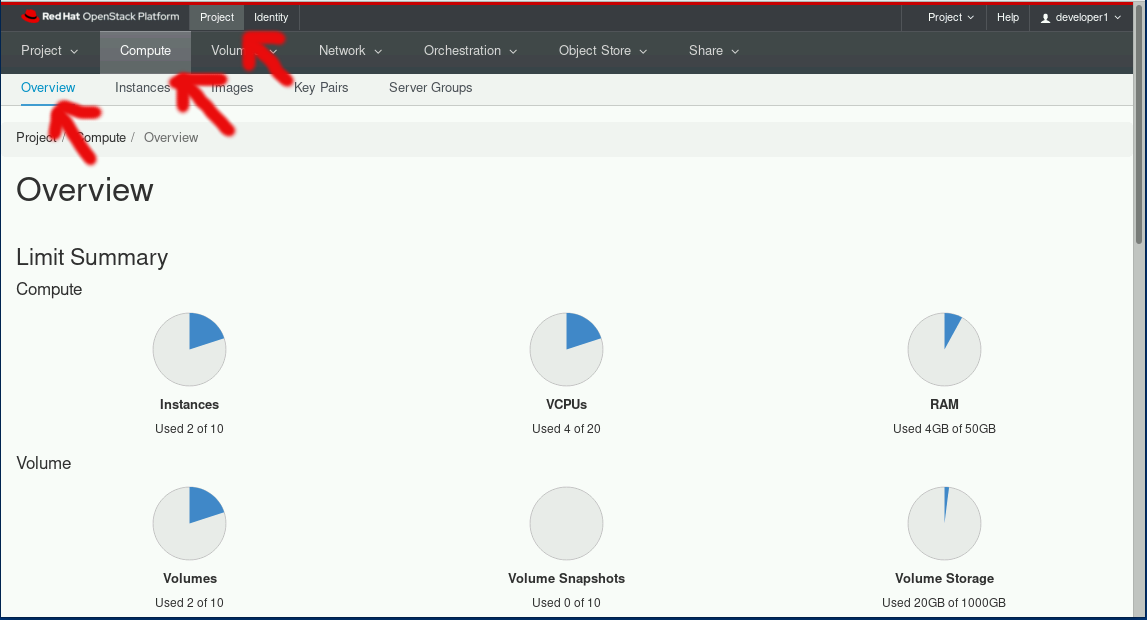
Most menu items in the second row relate to groups of resource types managed by OpenStack services: Compute, Volumes (storage), Network, and so on; and most items in the third row are individual resource types from those groups, for example: from Network, you see Networks, Routers, and Load balancers, among other items.
In the topmost row, to the right, you can select either Project or Identity, and the menu on the second-row changes accordingly. The first item to the left of the second row reflects the selection of the first or topmost row, so it’ll be either Project or Identity. The following figure shows how the second-row changes after you select Identity and enter the Identity / Projects page.
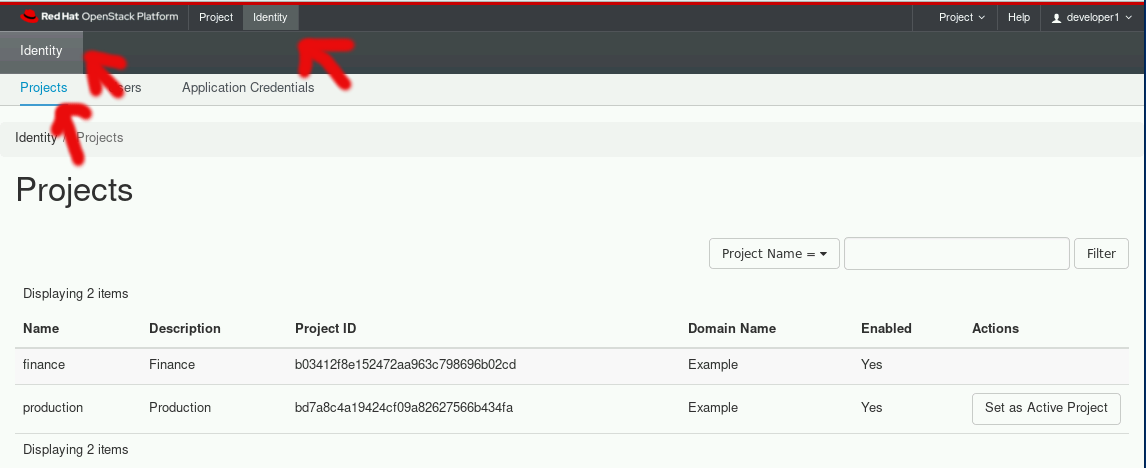
OpenStack operators spend most of their time on the Project’s topmost menu. They only select Identity when they need to manage access to OpenStack resources and applications to other operators and application administrators.
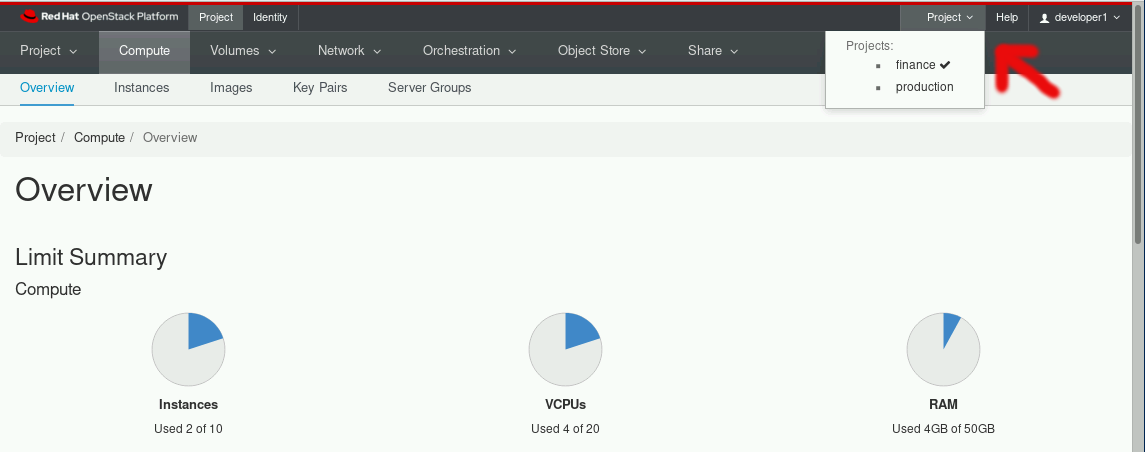
To the right, there’s another menu item named Project, also in the topmost row. This menu enables switching between multiple OpenStack projects a user may have access to. Switching projects brings you back to the Project / Compute / Overview page. The following figure displays two projects to which the OpenStack Operator user has access to.
The item Help to the topmost right opens another browser window on the OpenStack community docs — not the Red Hat OpenStack product documentation!
Finally, the item to the top left with the user name ("developer1" in the previous figure) enables Signing out of Horizon and logging in as a different OpenStack user.
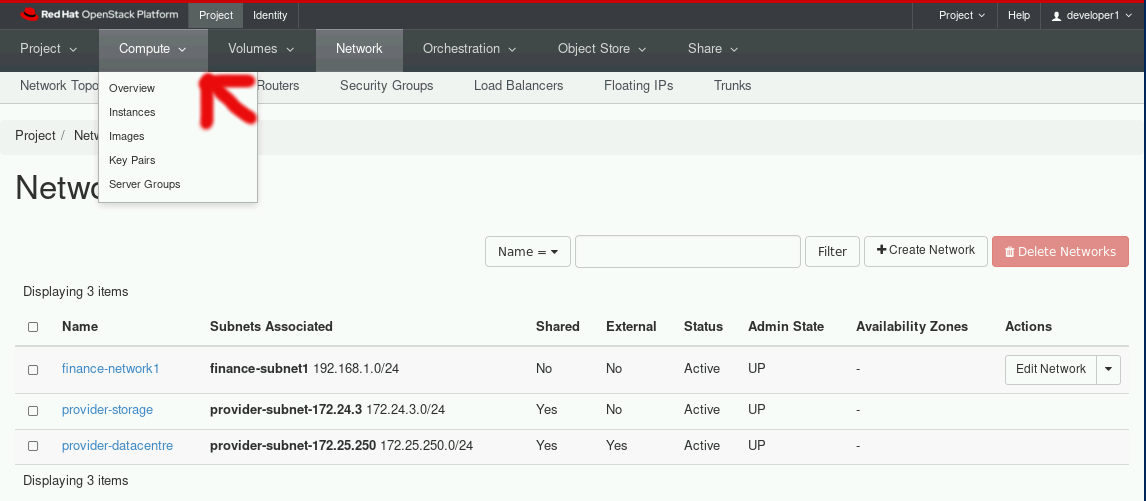
Notice that each menu item on the second row, except for the currently selected one, displays a down arrow (or a letter "v") to signal it displays a pull-down menu. Each item on the pull-down menu is a tab of that menu item, so you can quickly switch to different pages with fewer mouse clicks. The following figure shows, as an example, the Project / Network / Networks page with the pull-down menu from Projects. Notice that the Networks tab itself is hidden behind the pull-down menu.
If you switch to an OpenStack Administrator user, the topmost menu includes a new item: Admin. That item enables access to a different set of API resources in the menu from the second row. The names of items in the second row may look the same as the Project top most menu, but the pull-down menu and its tabs display different resource names. The next figure shows the Admin / Compute / Hypervisors page.
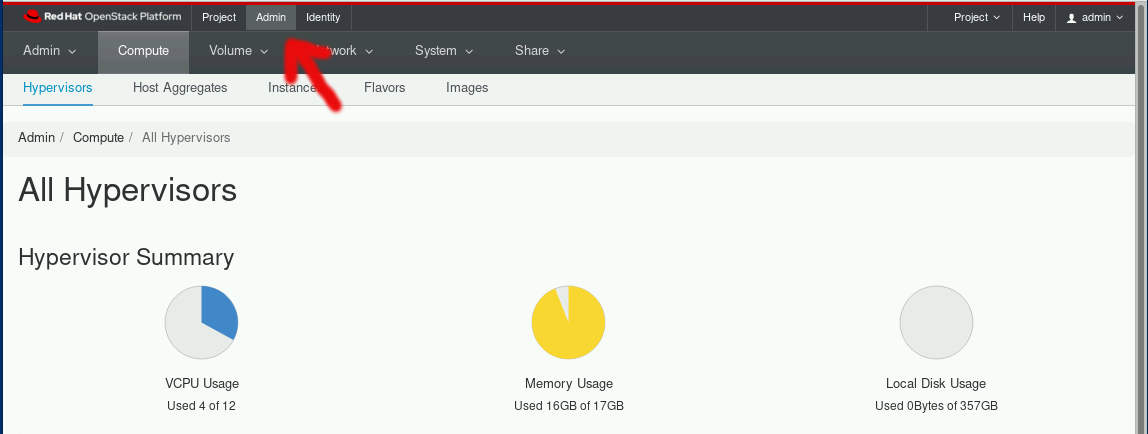
Those new tabs and pages enable managing OpenStack API resources which require elevated privileges, to which OpenStack Operators usually have no access, and that can impact the entire cluster, as opposed to resources that belong to one application or workload.
Comparing Horizon with the OpenStack Client
You already know that the Horizon dashboard does not provide access to all OpenStack resources and their APIs. There are tasks, for both Operators and Administrators, which may require using the OpenStack client or may be easier to perform using it.
Becoming proficient in the OpenStack client also enables the usage of automation tools, such as CI/CD pipelines and issue-tracking systems. The OpenStack client can also access OpenStack’s own automation tool, the Heat service, which we will introduce to you in the next chapter of this course.
Horizon is easier for beginner Operators because they can see all arguments to an API call on the same page, or in related pages of a multiple-form workflow. Horizon may provide defaults, or show the available alternatives, which would require additional commands using the CLI.
Horizon can also group multiple resources, sometimes from different services, on the same page, providing workflows that tend to require less steps and can be easier to understand than equivalent workflows using the OpenStack client.
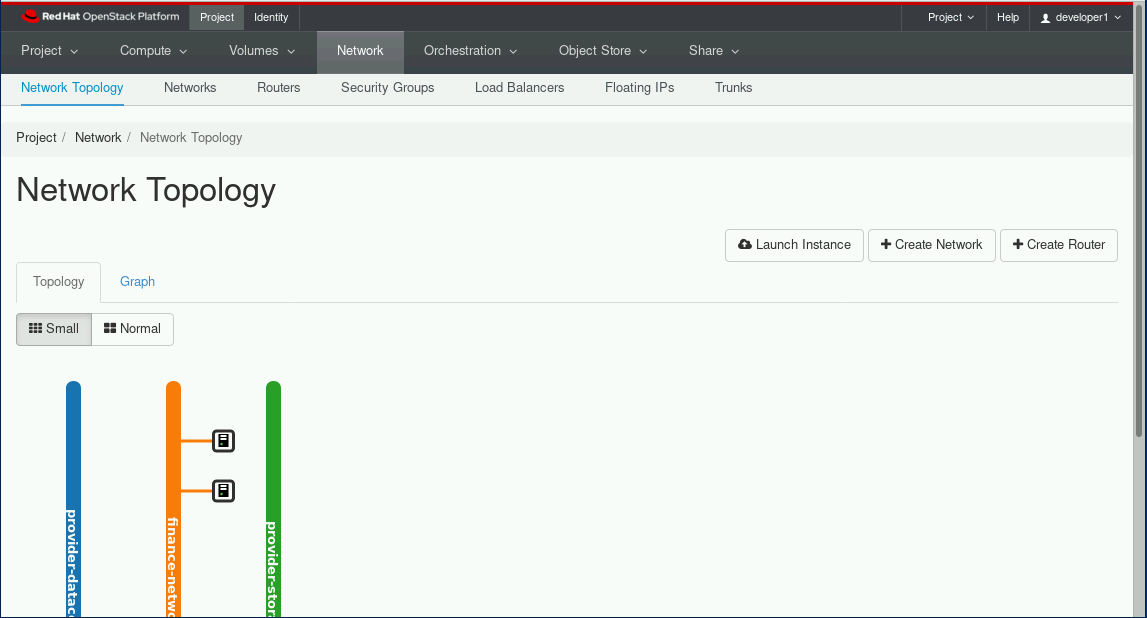
Some Horizon pages provide a summary view of information from multiple resources that would be very hard to collect and display using CLI tools, for example the Project / Compute / Overview page from the first figure, or the Project / Network / Topology page of the following figure. Those pages make Horizon more than just a web interface to OpenStack API resources, but a true dashboard of information for OpenStack Operators.