4. Creating Content
You should have received commit access to the quick course(s) GitHub repository that you are contributing to.
You will start off by cloning the source code from GitHub locally on your workstation.
Clone Source Code
-
Identify the quick course git url by navigating to the GitHub repository for the quick course and then click on the green < > Code button to expand it
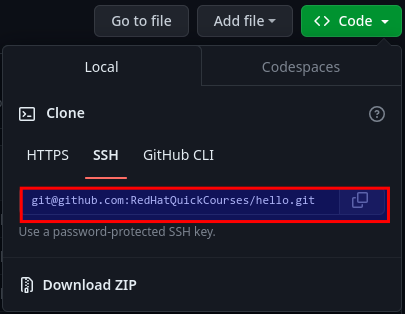 Figure 1. Git repo URL
Copy the SSH URL of the GitHub repository for the next step.
-
Clone the Git repository for a quick course to a folder of your choice. For the following steps in this guide, this folder is indicated by $CONTENT_ROOT:
$ git clone <quick course git url>
Paste the URL of the Git repository you copied in the previous step. This command should download a copy of the latest source code tree for the quick course.
-
The source code tree contains a number of configuration files and Antora specific directory structure that is optimized for simplicity and ease of quick course authoring.
Install Antora and Other Development Tools
-
Navigate to the folder where you cloned the source code for the quick course ($CONTENT_ROOT) from the command line terminal:
$ cd $CONTENT_ROOT
-
Run npm install to install Antora and other development tools
$ npm install
Editing Asciidoc Source
The Git repository contains the default chapter and section stubs with comments from the course product owner and architect to help guide you.
-
Inspect the $CONTENT_ROOT/antora.yml file. The list under the
navkey defines the top level modules (chapters) in this course. This file also contains some basic metadata (name, title and version) about this quick course.name: hello title: Hello version: 1 nav: - modules/ROOT/nav.adoc - modules/chapter1/nav.adoc - modules/chapter2/nav.adoc - modules/chapter3/nav.adoc - modules/appendix/nav.adoc -
Antora (our publishing system) looks for asciidoc source file under the
$CONTENT_ROOT/modulesfolder. Each top level chapter in the quick course is a unique folder under themodulesfolder.By convention, the entry point for each module is named
nav.adocand is located in the$CONTENT_ROOT/modules/module_namefolder. This file lists the sections in the chapter.* xref:index.adoc[] ** xref:section1.adoc[] ** xref:section2.adoc[] ** xref:section3.adoc[]As a convention, the home page for a chapter is a file named
index.adoc. The sections in a chapter are listed as nested entries underindex.adoc. -
The entry/starting point for the course is always called the
ROOTmodule (the folder should be calledROOTunder themodulesfolder), and is rendered from asciidoc content in the $CONTENT_ROOT/modules/ROOT/pages/index.adoc file. -
Image files for a chapter are stored in the $CONTENT_ROOT/modules/<module_name>/images folder. You can then reference the image files in asciidoc source using the
image::attribute:image::image.png[title="caption/title for image"]
Create a Local Git Branch
It is a Git best practice to make changes in a local Git branch, and then get the contents in the branch reviewed by your peers or the product owner/architect. Finally, merge your changes to the main branch, from which the HTML is rendered to the production website.
-
Before you make any changes, create a local Git branch and switch to it. From the $CONTENT_ROOT folder, run the
git branchcommand:$ git checkout -b rsriniva/index_page_update Switched to a new branch 'rsriniva/index_page_update'It is a good practice to prefix the branch name with your GitHub ID or a string that uniquely identifies you. Ensure that you use an appropriate branch name to easily identify your changes. ch02s03, rhods_pipelines_lecture, bug_fix_issue_496 are good branch names. mybranch, changes, hello123 are not.
You are now ready to start making changes.
-
To add a new chapter to the course create a new folder under the
$CONTENT_ROOT/modulesdirectory and name it appropriately. Then, create thenav.adocunder the new module directory, followed by thepagesandimagesfolder. Add new sections for the chapter by creating new asciidoc files under thepagesdirectory.
To write narrative and hands-on lab content, edit the asciidoc files under $CONTENT_ROOT/modules/module_name/pages. You can use the asciidoctor preview plug-in (Press "Ctrl + Shift + V" on Linux; Press "Cmd + Shift + V" on macOS) to preview the rendered HTML content.
| The asciidoctor preview plugin does not show the actual rendered UI as seen by a student taking the course. It should be used as development tool to get a rough structural preview of the content. |
Previewing Generated HTML
To preview the rendered website as it would look for end-users consuming this content, do the following:
-
Run the npm run watch:adoc command from the
$CONTENT_ROOTfolder to automatically detect changes to your asciidoc content and invoke the Antora HTML generator:$ npm run watch:adoc > watch:adoc > watch 'npx antora antora-playbook.yml' ./modules > Watching ./modules Site generation complete! ...Keep this terminal open as long as you are editing the asciidoc source code.
-
In another terminal window, run the npm run serve command from the
$CONTENT_ROOTfolder that starts a local web server that serves the generated HTML content:$ npm run serve > serve > npx http-server build/site -c-1 Starting up http-server, serving build/site ... Available on: http://127.0.0.1:8080 ... Hit CTRL-C to stop the serverYou will be shown the local URL (http://127.0.0.1:8080) where you can view the rendered content. Open the link in a web browser.
-
Keep making changes in your asciidoc source files. The npm watch command will automatically detect your changes and re-generate the HTML content. Refresh your web browser to view the updated content.
Keep this terminal open as long as you want to preview the generated HTML content.
Once you are satisfied with your changes, you can close both terminal windows by pressing (Ctrl + c).
| Automatic detection of asciidoc source code changes and HTML regeneration sometimes fails (for example, when your workstation goes to sleep or suspend mode). In such a scenario, press Ctrl + c in both terminal windows and restart the npm commands. |
Commit and Push Branch Changes
After you are satisfied with how the HTML content is rendered locally in your workspace, you can commit your changes to your local branch.
-
First, confirm that you are currently in your local branch, and not in main.
$ git branch
  main
* rsriniva/index_page_update
The *before the branch name in the output ofgit branchindicates the current "active" branch.Then, view and confirm all your changes:
$ git status On branch rsriniva/index_page_update Changes not staged for commit: (use "git add <file>..." to update what will be committed) (use "git restore <file>..." to discard changes in working directory) modified: modules/ROOT/pages/index.adoc no changes added to commit (use "git add" and/or "git commit -a") -
Add all the files you want to commit to the branch.
$ git add . -
Commit your changes.
$ git commit -m "updated course index page" -
Push your local branch to GitHub. This command will create a new branch in the course GitHub repository.
$ git push -u origin rsriniva/index_page_update
...
remote: Create a pull request for 'rsriniva/index_page_update' on GitHub by visiting:
remote:      https://github.com/RedHatQuickCourses/hello/pull/new/rsriniva/index_page_update
remote:
To github.com:RedHatQuickCourses/hello.git
 * [new branch]      rsriniva/index_page_update -> rsriniva/index_page_update
branch 'rsriniva/index_page_update' set up to track 'origin/rsriniva/index_page_update'.