MinIO S3 Compatible Storage Setup
Deploy MinIO as S3 compatible storage
MinIO overview
MinIO is a high-performance, S3-compatible object store. It can be deployed on a wide variety of platforms, and it comes in multiple flavors.
This segment describes a very quick way of deploying the community version of MinIO in order to quickly setup a fully standalone Object Store, in an OpenShift Cluster. This can then be used for various prototyping tasks that require Object Storage.
| This version of MinIO should not be used in production-grade environments. Additionally, MinIO is not included in RHOAI, and Red Hat does not provide support for MinIO. |
MinIO Deployment
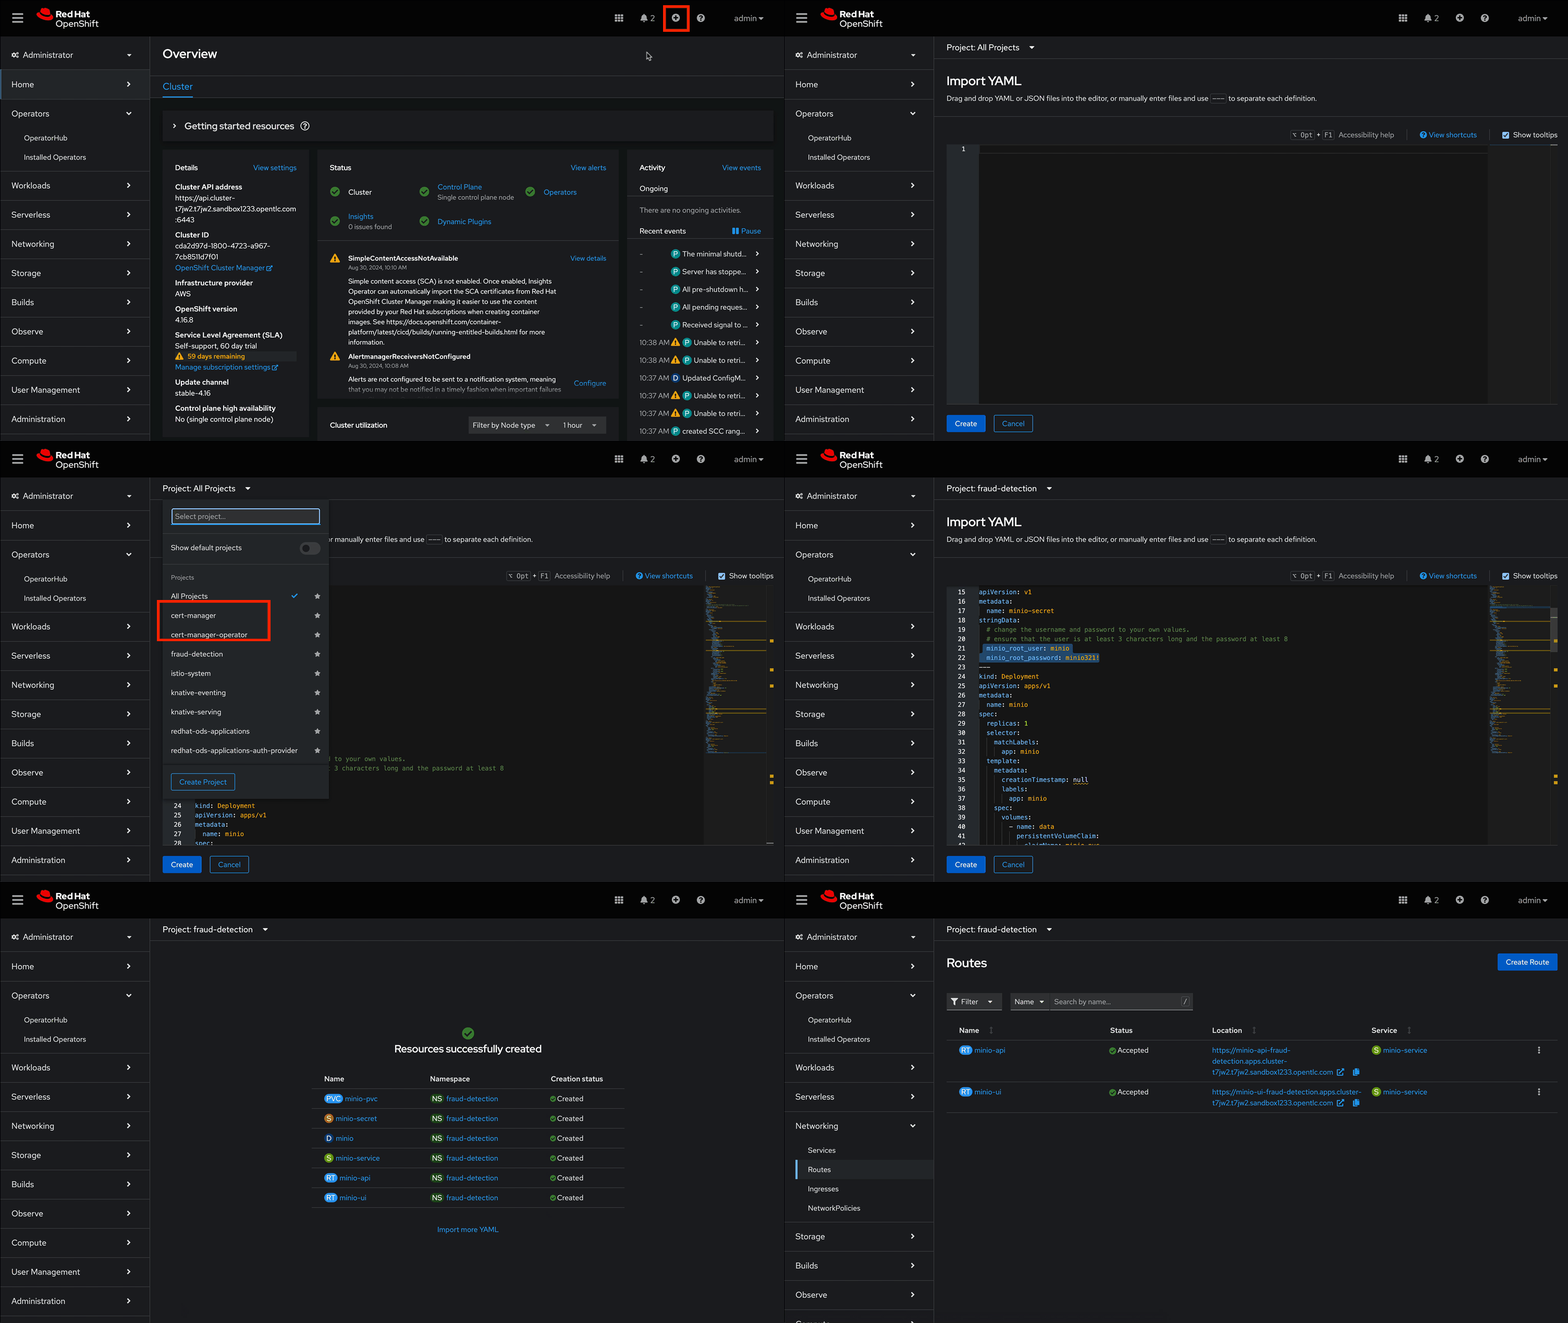
To Deploy MinIO, we will utilize the OpenShift Dashboard.

-
Then Select the + (plus) icon from the top right of the dashboard.
-
In the new window, we will paste the following YAML file. In the YAML below its recommended to change the default user name & password.
-
Click on the Project Selection list dropdown and select the ollama-model project or the data science project you created in the previous step.
-
Select the create button to deploy the Minio software.
Minio Deployment Code
Click to view and copy Minio deployment code.
kind: PersistentVolumeClaim
apiVersion: v1
metadata:
  name: minio-pvc
spec:
  accessModes:
    - ReadWriteOnce
  resources:
    requests:
      storage: 40Gi
  volumeMode: Filesystem
---
kind: Secret
apiVersion: v1
metadata:
  name: minio-secret
stringData:
  # change the username and password to your own values.
  # ensure that the user is at least 3 characters long and the password at least 8
  minio_root_user: minio
  minio_root_password: minio321!
---
kind: Deployment
apiVersion: apps/v1
metadata:
  name: minio
spec:
  replicas: 1
  selector:
    matchLabels:
      app: minio
  template:
    metadata:
      creationTimestamp: null
      labels:
        app: minio
    spec:
      volumes:
        - name: data
          persistentVolumeClaim:
            claimName: minio-pvc
      containers:
        - resources:
            limits:
              cpu: 250m
              memory: 1Gi
            requests:
              cpu: 20m
              memory: 100Mi
          readinessProbe:
            tcpSocket:
              port: 9000
            initialDelaySeconds: 5
            timeoutSeconds: 1
            periodSeconds: 5
            successThreshold: 1
            failureThreshold: 3
          terminationMessagePath: /dev/termination-log
          name: minio
          livenessProbe:
            tcpSocket:
              port: 9000
            initialDelaySeconds: 30
            timeoutSeconds: 1
            periodSeconds: 5
            successThreshold: 1
            failureThreshold: 3
          env:
            - name: MINIO_ROOT_USER
              valueFrom:
                secretKeyRef:
                  name: minio-secret
                  key: minio_root_user
            - name: MINIO_ROOT_PASSWORD
              valueFrom:
                secretKeyRef:
                  name: minio-secret
                  key: minio_root_password
          ports:
            - containerPort: 9000
              protocol: TCP
            - containerPort: 9090
              protocol: TCP
          imagePullPolicy: IfNotPresent
          volumeMounts:
            - name: data
              mountPath: /data
              subPath: minio
          terminationMessagePolicy: File
          image: >-
            quay.io/minio/minio:RELEASE.2023-06-19T19-52-50Z
          args:
            - server
            - /data
            - --console-address
            - :9090
      restartPolicy: Always
      terminationGracePeriodSeconds: 30
      dnsPolicy: ClusterFirst
      securityContext: {}
      schedulerName: default-scheduler
  strategy:
    type: Recreate
  revisionHistoryLimit: 10
  progressDeadlineSeconds: 600
---
kind: Service
apiVersion: v1
metadata:
  name: minio-service
spec:
  ipFamilies:
    - IPv4
  ports:
    - name: api
      protocol: TCP
      port: 9000
      targetPort: 9000
    - name: ui
      protocol: TCP
      port: 9090
      targetPort: 9090
  internalTrafficPolicy: Cluster
  type: ClusterIP
  ipFamilyPolicy: SingleStack
  sessionAffinity: None
  selector:
    app: minio
---
kind: Route
apiVersion: route.openshift.io/v1
metadata:
  name: minio-api
spec:
  to:
    kind: Service
    name: minio-service
    weight: 100
  port:
    targetPort: api
  wildcardPolicy: None
  tls:
    termination: edge
    insecureEdgeTerminationPolicy: Redirect
---
kind: Route
apiVersion: route.openshift.io/v1
metadata:
  name: minio-ui
spec:
  to:
    kind: Service
    name: minio-service
    weight: 100
  port:
    targetPort: ui
  wildcardPolicy: None
  tls:
    termination: edge
    insecureEdgeTerminationPolicy: Redirect
This should finish in a few seconds. Now it’s time to deploy our storage buckets.
MinIO Storage Bucket Creation
From the OCP Dashboard:

-
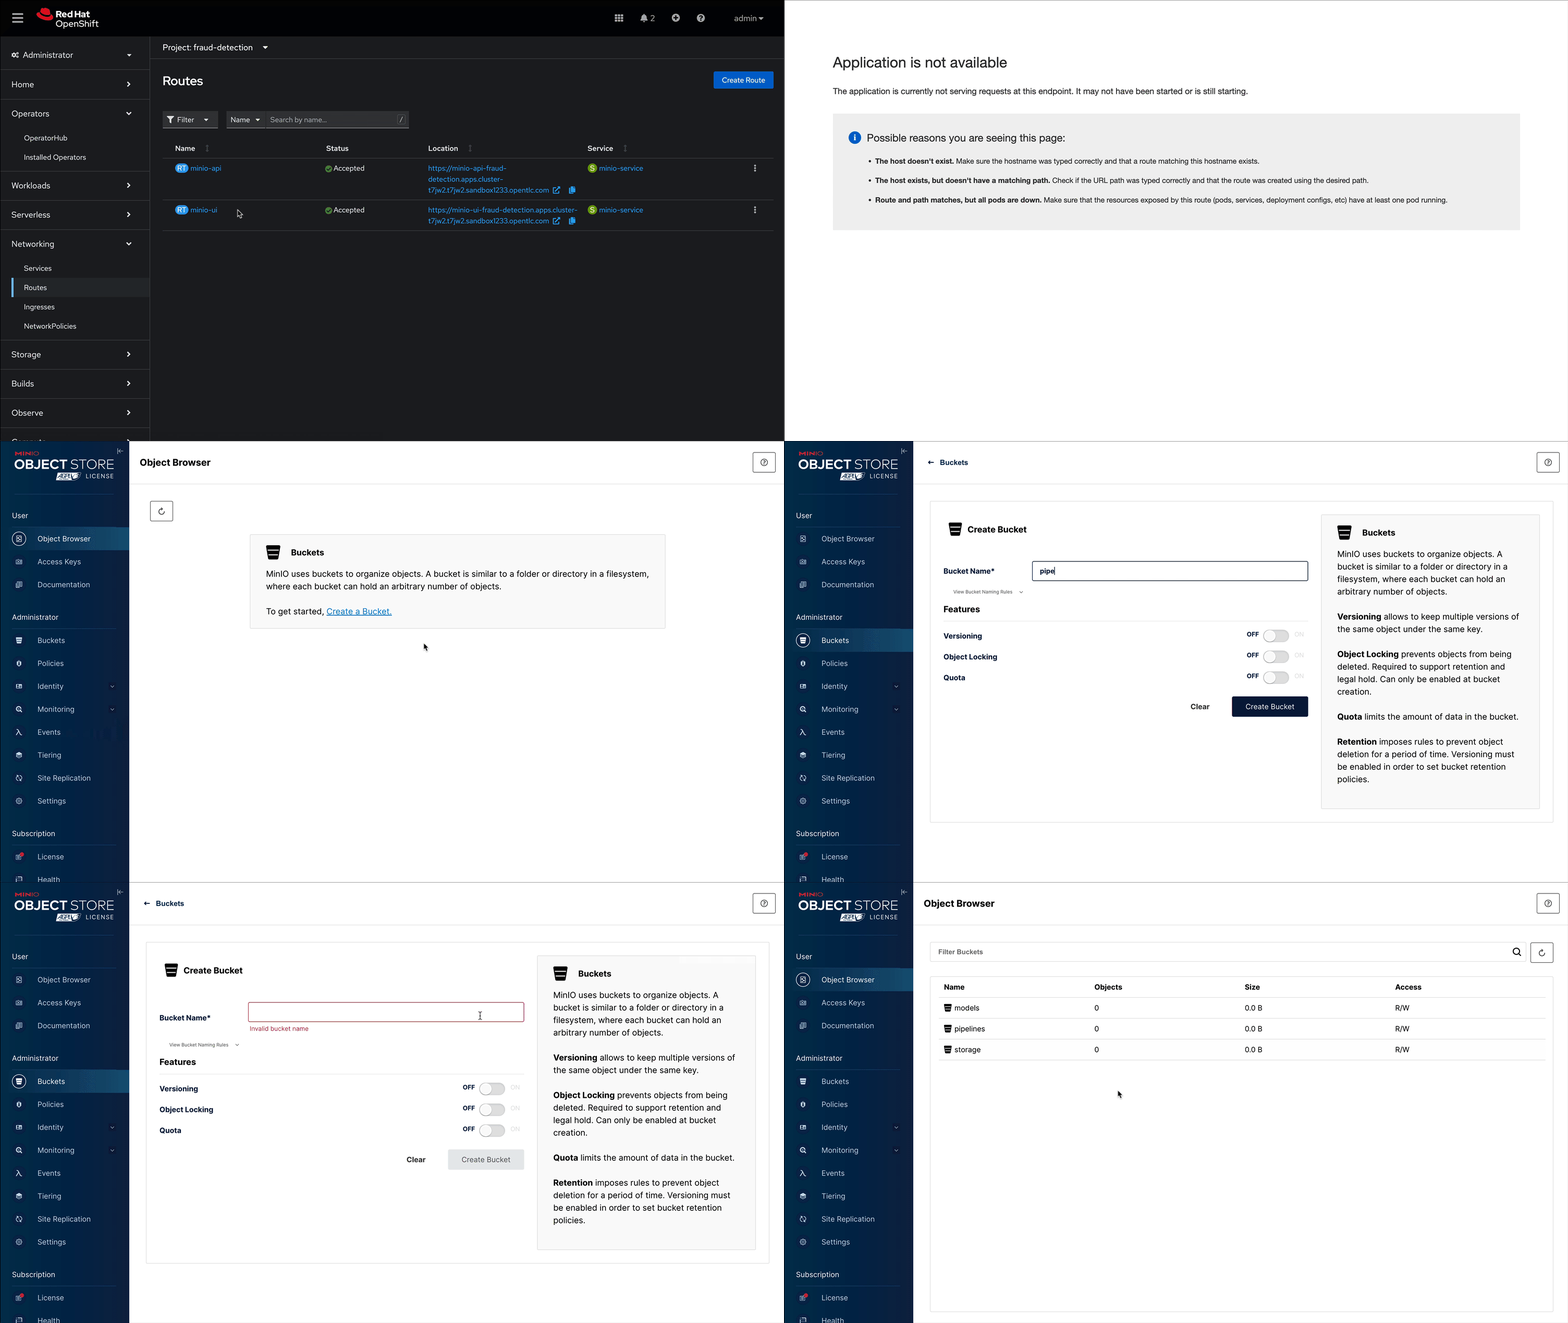
Select Networking / Routes from the navigation menu.
-
This will display two routes, one for the UI & another for the API. (if the routes are not visible, make sure you have the project selected that matches your data sicence project created earlier)
-
For the first step, select the UI route and paste it or open in a new browser tab or window.
-
If you see a landing page with the message application not available, refresh the page a few times as the service is still loading.
-
The displayed page is the MinIO Dashboard. Log in with the username/password combination you set, or the defaults listed below.
-
username = minio
-
password = minio321!
-
Once logged into the MinIO Console:
-
Click Create Bucket to get started.
-
Create two Buckets:
-
models
-
storage (optional)
-
| When serving an LLM or other model, Openshift AI expects to search within a directory. Therefore, we need at least one subdirectory under the models folder. |
-
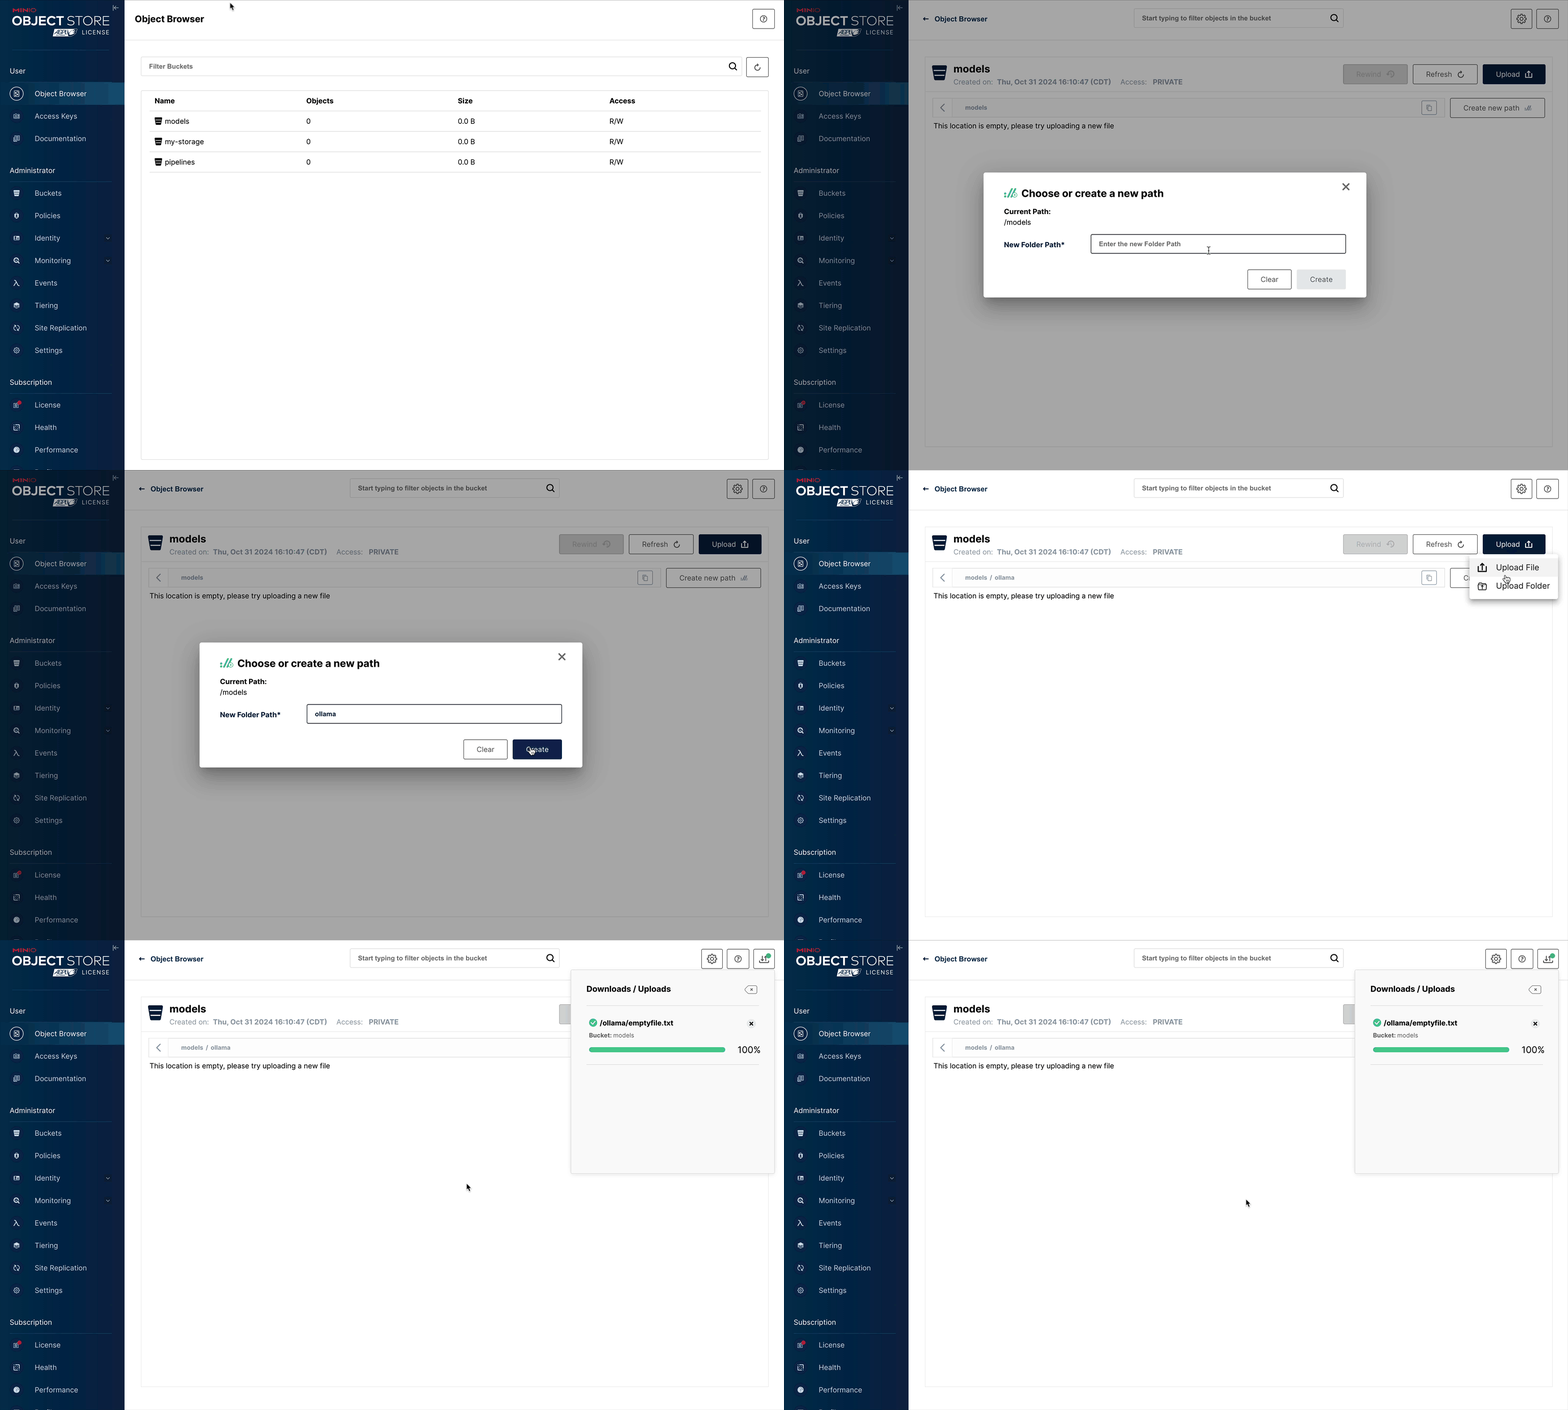
Via the Navigation menu, select object browser, then click on the Model Bucket.
-
From the models bucket page, click add path, and type ollama as the name of the sub-folder or path.
| In most cases, to serve a model, the trained model would be uploaded into this sub-directory. However, Ollama is a special case, as it can download and manage Several LLM models as part of the runtime. |
-
We still need a file available in this folder for the model deployment workflow to succeed.
-
So we will copy an emptyfile.txt file to the ollama subdirectory.
You can download the file from this location(use right click, save link as). Alternatively, you can create your own file called emptyfile.txt and upload it.
-
Once you have this file ready, upload it into the Ollama path in the model bucket by clicking the upload button and selecting the file from your local desktop.

With our S3 Compatible ready to go and our "model files" uploaded. Let’s head back to the OpenShift AI Web UI and continue configuring resources.